Kubernetes 從零開始 - 細看 Netflix 極限壓榨性能的挑戰學習部署策略
Scaling Workloads
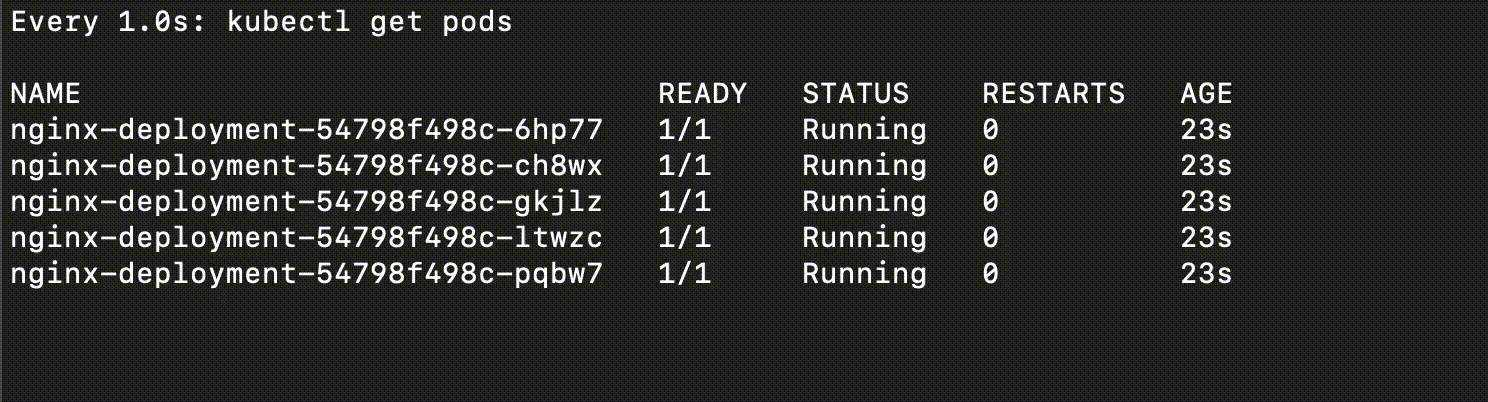
只有單台機器服務的情況下,多數是不足的
因為你需要考量到,比如說服務突然的不可用(軟體錯誤、硬體故障等等的),或者是流量真的大到一台機器處理不來的情況
這時候你就會需要用到 “scaling” 的概念
在 資料庫 - 初探分散式資料庫 | Shawn Hsu 中,我們有大概的看過一些概念
如今的系統架構,基本上都使用 scale out 的概念居多
原因在於說,單台機器的硬體資源是有上限的,你的 CPU 跟 Memory 不可能無限增加,相反的,多台機器可以解決這個問題(你可以無限增加機器數量,把它連起來就好)
Node.js PM2 的 cluster mode 也是利用了 scaling 的概念
scale out 要注意的是,你的服務最好是 stateless 的
stateful 其實也可以,只是資料一致性等等會是個滿大的問題
而 HTTP server 基本上都是 stateless 的,所以你可以很輕鬆的 scale out
還有一個很常見的誤區,monolithic 架構是可以 scale 的
不是只有 microservice 架構可以 scale
Manual Scaling
有一個真實的例子是這樣子的
行銷團隊預計在晚上的時候向使用者推播一個新消息
然後訊息內容裡面包含一個到官網的連結,告訴使用者說官網全新改版
所以其實我們可以預期說,在晚上的時候網站的流量應該會增加,是比平常還要多的那種程度
讓機器自己 scale 肯定是沒有問題的,但是我們都忽略了一個至關重要的細節
也就是雲端自己把機器建立起來,執行起來是需要花時間的
這個等待時間是致命的
因為可能第二台機器上線了,然後因為這個 delay,使用者早就看完並離開,流量又下去了
然後他什麼也沒做就又被迫下線,然後使用者體驗到的是一個卡到爆的網站
可能行銷帶來的效益就不是那麼足夠了
也因此,針對這種 已知會有流量增加的 的情況,比較好的方式是事先手動增加服務容量
換句話說,在行銷團隊要發送推播的時候,工程團隊就必須先手動調整好伺服器的設定,用以應對接下來的流量
這樣使用者體驗到的就會是流暢的服務
Auto Scaling
相比之下,auto scaling 能夠自己根據目前不同的負載自動的調整所需要的資源
如果單純的 scale workloads 還無法滿足需求,那就需要進行 node 的 scale 了
可以參考 Node Autoscaling
Horizontal Pod Autoscaler(HPA)
在 Kubernetes 中,scale out 是透過 Horizontal Pod Autoscaler(HPA) 來實現的
HPA 是透過所謂的 control loop 去不定時的監控底下的資源(預設是 15 秒掃一次,但可以用 --horizontal-pod-autoscaler-sync-period 來調整)
具體來說是,在 HorizontalPodAutoscaler CRD 裡面,指定說你要監聽的 resource 是哪一個(apiVersion, kind 跟 name)
然後就看該 resource 的 metrics 做調整
對於那種不支援 scale 的 resource 如 DemonSet 是沒辦法使用 HPA 的
更具體一點來說,他是根據 metrics 決定 replica 的數量的
\[desiredReplicas = \lceil currentReplicas \times \frac{currentMetric}{desiredMetric} \rceil\]這個公式中,透過計算 metric 的比值決定你需不需要調整 replica 的數量
完美的情況下,這個比值應該為 1,所以 desiredReplicas 會等於 currentReplicas
而因為 metric 的資料是即時且不斷變化的,replica 數量會被一直調整
造成所謂的 thrashing 現象(或稱 flapping)
flapping 的問題可以透過設定 Stabilization Window 以及 Tolerance 來調整
The Scaling Behavior
要如何 scale 是個好問題
replica 的數量如果忽高忽低,對底層的 infra 來說是一種負擔,何況是對使用者
因此,在 HPA 裡面,你可以細部調整 K8s 要如何 scale
具體來說,有 Scaling Policy, Stabilization Window 以及 Tolerance 可以調整
Tolerance
tolerance 本質上就是允許一定程度的上下浮動
讓 replica 的數量不會太過敏感
預設情況下是 10% 的誤差範圍,可以透過 --horizontal-pod-autoscaler-tolerance 來調整
或是 CRD 裡面直接指定 tolerance(可以參考 HorizontalPodAutoscalerSpec)
1
2
3

behavior:
  scaleUp:
    tolerance: 0.05 # 5% tolerance for scale up
Stabilization Window
stabilization window 也可以解決 flapping 的問題
因為 metric 的資料不間斷變化會造成 Pod 的數量不斷的上下浮動
既然數量會一直變化,其中的一個辦法是取一段時間區間,看說這段時間內,Pod 的數量如何
HPA 的算法會在資料區間,取得 最高的 replica 數量 使用
為什麼是最高?
-
如果流量一會高一會低,區間內最高值基本上就會是 持平 的趨勢
也就是說 Pod 並不會突然的被刪掉又被加回來 -
如果流量確實在減少,那麼計算出來的 desired replica count 肯定會隨著時間越來越少
每一次的 evaluation 如果都取最高值,最終也會呈現 緩降 的趨勢
如此一來便達到穩定的目的
stabilizationWindowSeconds 也可以設定 scaleUp 的狀況
只是不太常這樣用,因為 scale up 就代表很緊急了(客訴滿天飛),所以不需要穩定期
1
2
3

behavior:
  scaleDown:
    stabilizationWindowSeconds: 300
可以在 CRD 裡面直接指定 stabilizationWindowSeconds(可以參考 HorizontalPodAutoscalerSpec)
Scaling Policy
另外的 scaling policy 也同樣可以應用於 scaling 的調整
有別於 Stabilization Window 以及 Tolerance 針對 replica 數量的決策
policy 主要著墨在 “如何調整”
1
2
3
4
5
6
7
8
9

behavior:
  scaleDown:
    policies:
    - type: Pods
      value: 4
      periodSeconds: 60
    - type: Percent
      value: 10
      periodSeconds: 60
可以在 CRD 裡面直接指定 policies(可以參考 HorizontalPodAutoscalerSpec)
假設計算出來的 desired replica 是 100 但是當前只有 10
意味著 90 個 Pod 要被啟動
一次性啟動這麼多 Pod,雖然是合法的,但你其實不確定這會不會造成問題
像我自己在本機跑 cluster 的時候,如果一次建立這麼多的 Pod,我是有感覺到電腦忽然變卡
而這種穩定性問題是需要被重視的
既然不建議一次啟動這麼多 Pod,分批也是可行的選項
所以這其實就是 scaling policy 要做的事情
透過定義 “如何” 調整,穩定的 scale 才是我們想要的
上述例子中
- policy[0] 代表著 60 秒內只能調整 4 個 Pod
- policy[1] 代表著 60 秒內只能調整總體 10% 的 Pod
你可以針對 scaleUp 以及 scaleDown 分別指定不同的 policy
然後如果你有多個 policies,可以額外設定 .spec.behavior.scaleUp.selectPolicy 決定要怎麼挑
是要在眾多 policies 中挑選 影響最大還是最小的(Min, Max),又或者是禁用調整(Disabled)呢?
預設 selectPolicy 會挑影響最大的,也就是
Max
Metric Data
稍早在 Horizontal Pod Autoscaler(HPA) 提到,replica 數量是透過 metric 來決定的
可是還是很抽象,究竟要監聽什麼呢?
更具體的來說,你可以使用以下這些資源
-
Resource- 一個最基本的判斷方式就是使用 CPU, Memory 的資源去判斷需不需要 scale
每個 scale target 底層一定都是執行 Pod,每個 Pod 用的資源都不一樣,多個 Pod 的資源會被 平均起來 計算進而得出 current metric不過,由於他會被平均起來,所以有可能總體是足夠的,但其中某個 Pod 累得半死也是有可能的
- 一個最基本的判斷方式就是使用 CPU, Memory 的資源去判斷需不需要 scale
-
ContainerResource- 為了避免 Pod 平均帶來的誤差,你也可以指定在 container level 計算
其他都跟Resource一樣,只不過是看 scale target 底下的 Pod 底下的 container
而且也都是會被平均起來算出 current metric
- 為了避免 Pod 平均帶來的誤差,你也可以指定在 container level 計算
-
Pods- 我們稍早都是在看 CPU, Memory 的資源,那有沒有其他資源可以使用呢?
答案也是肯定的,只不過需要客製化(可以參考 Metrics APIs)
計算方式也一樣,會被平均起來做比較
- 我們稍早都是在看 CPU, Memory 的資源,那有沒有其他資源可以使用呢?
-
Object- 這種類型比較特別,他是監聽 single Kubernetes object 的 metric
文件上的例子是 Ingress 的 hits-per-second
在建立路由的時候,你的規則是定義在 Ingress Object 內,配合 Metrics APIs 可以搭配查詢說有多少流量進來
- 這種類型比較特別,他是監聽 single Kubernetes object 的 metric
-
External- 這種類型比較特別,他是監聽 external resource 的 metric
外部指的就是說,這個 metric 不是 Kubernetes 內建的,而是你自行定義的
比方說,consumer 的數是由 message queue 內部的資料數量決定,而當然他也是需要 Metrics APIs 的配合
- 這種類型比較特別,他是監聽 external resource 的 metric
可以參考
$ kubectl explain hpa.spec.metrics
公式裡的 current metric 已經定義好了
剩下的 desired metric 就相對簡單了
就三種類型
-
averageUtilization: 平均的數字(百分比) -
averageValue: 平均的數字 -
value: 單純的數字,沒有平均過的數值(適用於Object這種,比方說計算 hits-per-second 的時候)
Resource搭配averageUtilization會變成平均的平均嗎?
是 current metric 先平均,得到 A 這個平均值,然後跟 desired metric 的平均值 B 相比較
可以參考
$ kubectl explain hpa.spec.metrics.{metric_type}.target
Metrics APIs
我們知道了要監聽什麼,監聽的資料從哪來又是個問題
HPA controller 是透過 Metrics API 取得資料的
而以下的設定是必要的
- API Aggregation Layer 需要被啟用
- Metrics API 需要被啟用。基本上來說,分成三大種
-
resource metrics: 基本上資料會從 metrics server 取得,資料內容會是 K8s object 的資料 -
custom metrics: 但是如果你需要自己客製化資料,就是 custom metrics。注意到他還是使用 K8s object 的資料 -
external metrics: 客製化,但是是外部的資料
-
舉例來說 kubernetes-sigs/prometheus-adapter 裡面包含了 custom metrics 以及 external metrics 的實現
Summary
HPA 的概念稍微複雜許多,你需要搞清楚不同資源下需要的設定檔是哪一種
並且需要意識到在 scaling 的過程中可能產生的問題
東西蠻多,需要多多消化
Vertical Pod Autoscaler(VPA)
在 Kubernetes 中,scale up(調整 Pod 的資源,比如說 CPU 跟 Memory) 是透過 Vertical Pod Autoscaler(VPA) 來實現的
VPA 並非內建的,是需要額外安裝的(kubernetes/autoscaler)
VPA 會需要額外的 metrics server 取得目前的資源使用情況
使用的部分,你會需要撰寫 VerticalPodAutoscaler 的 CRD 來實現
然後再 CRD 內部,指定你要監聽的 Resource 是什麼,比如說這個例子會是 hamster
1
2
3
4
5
6
7
8
9
10
11
12
13
14
15
16
17
18
19
20
21
22
23
24
25
26
27
28
29
30
31
32
33
34
35
36
37
38
39
40
41
42
43
44
45
46
47
48
49
50
51
52
53
54
55
56
57
58
59
60
61
62

# This config creates a deployment with two pods, each requesting 100 millicores
# and trying to utilize slightly above 500 millicores (repeatedly using CPU for
# 0.5s and sleeping 0.5s).
# It also creates a corresponding Vertical Pod Autoscaler that adjusts the
# requests.
# Note that the update mode is left unset, so it defaults to "Auto" mode.
---
apiVersion: "autoscaling.k8s.io/v1"
kind: VerticalPodAutoscaler
metadata:
  name: hamster-vpa
spec:
  # recommenders field can be unset when using the default recommender.
  # When using an alternative recommender, the alternative recommender's name
  # can be specified as the following in a list.
  # recommenders:
  #   - name: 'alternative'
  targetRef:
    apiVersion: "apps/v1"
    kind: Deployment
    name: hamster
  resourcePolicy:
    containerPolicies:
      - containerName: '*'
        minAllowed:
          cpu: 100m
          memory: 50Mi
        maxAllowed:
          cpu: 1
          memory: 500Mi
        controlledResources: ["cpu", "memory"]
    updatePolicy:
      updateMode: "Auto"
---
apiVersion: apps/v1
kind: Deployment
metadata:
  name: hamster
spec:
  selector:
    matchLabels:
      app: hamster
  replicas: 2
  template:
    metadata:
      labels:
        app: hamster
    spec:
      securityContext:
        runAsNonRoot: true
        runAsUser: 65534 # nobody
      containers:
        - name: hamster
          image: registry.k8s.io/ubuntu-slim:0.1
          resources:
            requests:
              cpu: 100m
              memory: 50Mi
          command: ["/bin/sh"]
          args:
            - "-c"
            - "while true; do timeout 0.5s yes >/dev/null; sleep 0.5s; done"
當你執行以上 Deployment 與 VPA 之後,過一陣子你會發現到,你的 Pod 的資源使用情況會被 VPA 調整
注意到是 Pod 的 resources 被調整,而非 Deployment 的 resources 被調整
VPA Operate Mode
上述的例子中你可以看到 VPA 有所謂的運作模式
| Mode | Description |
|---|---|
Off |
VPA 不會調整 Pod 的資源 |
Initial |
VPA 會在 資源建立的當下 調整 Pod 的資源,之後不會調整 |
Recreate |
會動態的調整資源,不論是建立還是更新都是 重新建立 新的 Pod |
Auto |
目前是 Recreate Operate Mode |
重新建立 Pod 這個行為有可能會影響到你應用程式的執行,所以他其實沒有那麼的適合
於是 Kubernetes VPA 團隊正在整合 In-place Pod Vertical Scaling 的技術
旨在不重新建立 Pod 的情況下調整其資源
恩? 整合?
Kubernetes 本身已經有支援 Pod 的資源的 In-place 調整(可以參考 Resize Container Resources)
也就是說其實 Pod 的資源的 In-place 調整已經支援了,只是 VPA 的整合還沒有完成
Resize Container Resources
具體來說,Pod 的資源可以不需要重新啟動就可以調整資源
事實上在 Kubernetes 早在 1.27 中引入了 InPlacePodVerticalScaling feature gate
並於 1.33 正式進入 beta 階段
然後 kubectl 也需要至少
v1.32才能使用--subresource=resize這個參數
1
2

$ kubectl get --raw /metrics | grep InPlacePodVerticalScaling
kubernetes_feature_enabled{name="InPlacePodVerticalScaling",stage="ALPHA"} 0
所以要怎麼 resize 資源呢?
1
2

$ kubectl patch pod resize-demo --subresource resize --patch \
  '{"spec":{"containers":[{"name":"pause", "resources":{"requests":{"cpu":"800m"}, "limits":{"cpu":"800m"}}}]}}'
或者是直接
apply -f --subresource resize --server-side會比較直覺
同一時間你會需要所謂的 resize policy
一個新定義的欄位 spec.containers[].resizePolicy
1
2
3
4
5

resizePolicy:
- resourceName: cpu
  restartPolicy: NotRequired
- resourceName: memory
  restartPolicy: RestartContainer
以上兩個資源的 restartPolicy 不一樣的情況下
會 fallback 成RestartContainer,一個要重啟一個不要,那當然就是重啟囉(比較嚴格的 policy)
目前來說,Kubernetes 1.34 含以前,你只能更改 cpu 以及 memory 的資源
然後指定要不要進行重啟,如果沒指定,預設會是 NotRequired
會需要重啟的原因,比如說你的 application 需要重啟才能拿到更多 memory 之類的
而這個重啟很有意思的是,如果 Pod 等級的
restartPolicy是Never
在resizePolicy.restartPolicy就 只能指定為NotRequired
resize 要重啟但是 Pod 不重啟顯然這樣會衝突
init container 這種沒辦法重啟的是無法使用 resize 功能的(但是 sidecar 可以,可參考 Kubernetes 從零開始 - Sidecar 與 Lifecycle Hook 組合技 | Shawn Hsu)
不過這個 resize 的要求很大程度上是看目前的狀態而定
不能說你要求了 1 個 CPU,結果現在只有 0.5 個 CPU,這樣是不行的
你可以根據 Pod 回給你的狀態來確認這件事情
Pod status condition 的內容會有以下新增
-
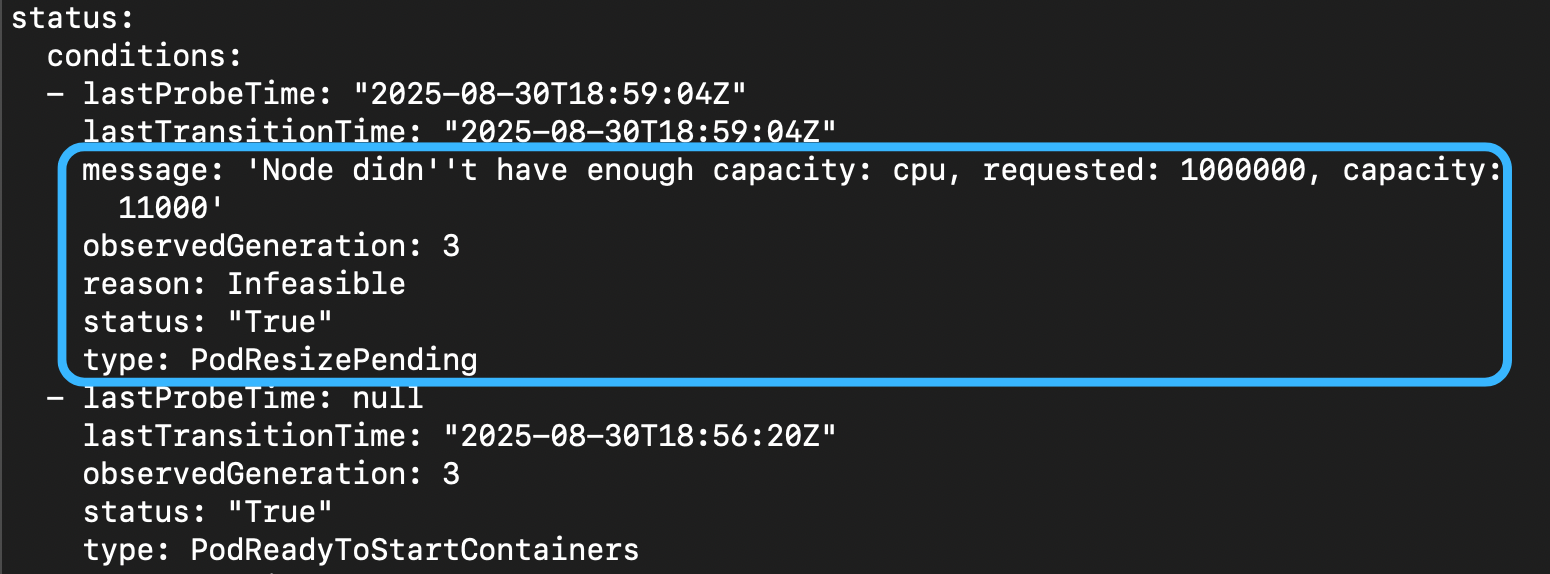
PodResizePendingtype- kubelet 已經確認了你的要求,但不能馬上滿足,根據
message的內容你可以確切地知道為什麼會 pending -
message-
reason: Infeasible: 你的要求根本不可能滿足(比方說你要求的 CPU 資源超過該節點的總量)
 -
reason: Deferred 你的要求目前不可能滿足,但我可以重試(我把某某 Pod 刪掉就可以滿足你的需求之類的)
-
- kubelet 已經確認了你的要求,但不能馬上滿足,根據
-
PodResizeInProgresstype- kubelet 已經確認你的要求並且正在調動資源,如果有出什麼意外,也會在
message中告訴你
- kubelet 已經確認你的要求並且正在調動資源,如果有出什麼意外,也會在
你會發現說,其實上面的狀態也不夠,因為完成是不會有狀態的,上述只會跟你講失敗的情況
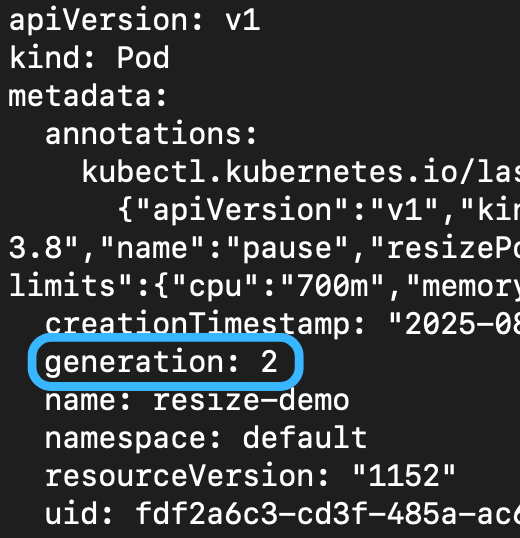
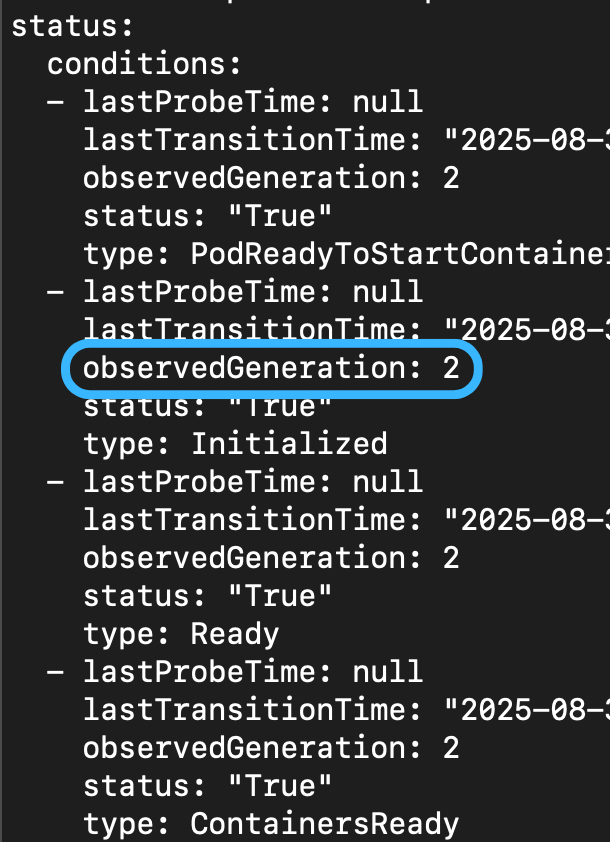
所以另外一個欄位 status.observedGeneration 被引入了(他是 PodObservedGenerationTracking feature gate,於 1.33 引入)
generation 的目的是在於紀錄每一次的改動(i.e. metadata.generation)
而 status.observedGeneration 則是紀錄 kubelet 已經確認並完成的 generation
.metadata.generation |
.status.observedGeneration 以及 .status.conditions[].observedGeneration
|
|---|---|
 |
 |
如果你更改的 resource 間接改動到 QOS class 也是不行的

簡單來說,Quality of Service(QOS) Class 會根據
requests,limits以及 container 的數量來決定
所以說你更改 resource 可能會間接改動到 QOS class
可以用以下指令開一台 cluster 來測試
Event Driven Autoscaling
利用 Kubernetes-based Event Driven Autoscaling 可以實現 event based 的自動擴展
比方說可以根據 message queue 內的資料量、API 請求數量或是 metrics server 提供的資訊等等所謂 Scalers 來自動擴展
KEDA 並不是用來取代 HPA 或是 VPA,而是用來補足他們的不足
這個工具能夠提供多樣化的 scaler 讓你根據不同的資源進行調節
所以 KEDA 是沒辦法自己獨立運行的
更甚至你可以利用 KEDA 做到 off-peak hour 的調整
就是比如說,在晚上的時候因為大家都在睡覺,所以上網的人可能會比較少,然後你就可以把資源降低
KEDA 的 Cron Scaler 就滿適合的
Scaler 其實有很多種,包含我有看到 Redis, Kafka, PostgreSQL 等等的
你甚至可以自己客製化 scaler
Netflix Smarter Live Streaming at Scale
我們看過了可以根據流量、資源以及 queue 的資料量大小等等的方式進行擴展
不過真實世界並不是那麼的簡單,這種單純的策略在某種情境下可能不適合
Netflix 於 2026 年 1 月,將 live streaming 背後的算法進行了一個更新
具體來說是從 CBR(Constant Bitrate) 更新到 VBR(Variable Bitrate)
簡單來說,串流影像會進行適當的編碼進行傳輸
傳統 CBR 的策略下,不論場景複雜與否,它都會使用相同的 bitrate 進行傳輸
而 VBR 的策略下,會根據場景的複雜程度以及帶寬等等的因素,動態的調整 bitrate
| Simple Scene | Complex Scene |
|---|---|
 ref: Smarter Live Streaming at Scale: Rolling Out VBR for All Netflix Live Events |
 ref: Smarter Live Streaming at Scale: Rolling Out VBR for All Netflix Live Events |
當你的場景是簡單的,比如說開場動畫,它並不複雜,因此你可以減少一些 bits
因為更多的 bits 的運算不會讓影像變得更好,反而會浪費資源
所以 VBR 的策略下,可以減少 bitrate 的消耗
複雜情況,VBR 就必須要提高,才能達到相同的效果
注意到,使用較少的 bits 的成像並不會比較差
The Change
使用 CBR,因為它使用的 bitrate 都是固定的,因此他的負載是可以預測的
也就是說,它不會因為不同的內容,有太多的變動
在部署以及擴展的層面上,他是 很好預測的
比方說你的 server 可以穩定的服務 2k requests
所以你知道說當超過的時候就應該 scale out
事情是非常簡單的
但問題就如同之前提到的
CBR 它會浪費一些資源,主要是因為你的內容是不確定的
有可能整段都是簡單的場景如談話節目,這時候你的 server 其實是可以 take 更多 loading 的
The Unpredictable Load
改成 VBR 之後你可以動態的調整 bitrate
但同一時間它會造成更嚴重的後果
因為 VBR 會根據當前影響動態調整,當 server 被發現有點閒,這表示它其實可以接受更多連線(server 空閒不是好事就是)
可是可能下一個場景就切換到複雜場景,但是 server 已經接受太多連線,bitrate 又上來,就會導致負載過高
導致以前用 CBR 可預測的負載變得 不可預測了
使用者可能就會遇到卡頓的狀況,很明顯這是不可接受的
The Scaling Strategy
與其單純看 loading
Netflix 選擇將 nominal bitrate 納入參考

ref: Smarter Live Streaming at Scale: Rolling Out VBR for All Netflix Live Events
針對同一場景,你可以從上述圖表中看到 CBR 與 VBR 的差別
以上是設定 nominal bitrate 為 8Mbps 的結果
你可以很輕易的得出這個結論 相同 nominal bitrate 不代表 average bitrate 相同(兩條線不同嘛)
nominal bitrate 就像一個上界
你的影像串流大部分的時間會處於這個界線,上圖的 CBR 結果也證實了這點
CBR 跟 VBR 可以套用相同的 nominal bitrate 嗎? 答案是不行的
因為 VBR 可以動態的調整 bitrate,所以它可以適應不同的場景
如果它計算出來需要的 bitrate 比 nominal bitrate 還要高,它不會超過它,因此畫質會被下降
所以 設定不能直接搬過來用
所以 Netflix 其實會做個比較
分別執行 CBR 與 VBR,當它發現 VBR 的效果不如預期,就提昇 nominal bitrate 直到效果符合預期(雖然提昇,但多數情況下 nominal bitrate 仍然比 CBR 來的低)
而串流通常不同畫質有不同設定,稱為 bitrate ladder
這個比較會在每一個不同畫質階梯做測試,讓 VBR 的壓縮仍然保有良好的畫質呈現
在少數情況下,VBR 的 nominal bitrate 需要高於 CBR 原本的設定才能達到一樣效果
也就是說,較小的 nominal bitrate 可以讓伺服器承受更多負載
同時因為他是上界,所以你可以更放心的進行 scaling 而不必擔心負載過高
同時也能得到更好的效能表現
Different Deployment Strategies
現在的服務基本上講究一個 zero downtime,要給使用者不間斷的服務
而為了達成這個目標,部署策略就需要經過設計
最簡單的部署方式就是停機維護
而停機維護是相對不友善的選擇,卻也是對開發者最友善的模式
龐大的資料升級,資料庫遷移等等的,停機維護可以將所有的風險降到最低
雖然仍然有辦法達成 zero downtime,但這部分的操作會需要團隊更細心的安排與規劃
有關 migration 可以參考 資料庫 - 新手做 Data Migration 資料遷移 | Shawn Hsu
比較保險的方式會是擁有多台機器逐台更新,也就是要求你的服務具備一定 scaling 的能力
因為至少在你更新 A 機器的時候,BCD 依然可以服務使用者
多台機器的情況下事情就變得有趣了,你會有不同的策略比如說 Canary Deployment 或者 Blue Green Deployment
Recreate and Rolling Update
停機維護最主要是指你的系統沒辦法兼容兩個不同版本同時運行
因為他有可能使用的 database schema 不同,同時運行會造成資料毀損等問題
次要則是一些比如說底層作業系統更新、網路設備更新抑或是硬體設備維修更新等等
雖然通常這會比較偏向 排程維護更新 的範疇,但廣義上仍然是屬於 Recreate(因為服務對使用者不可用)
與 Recreate 會造成所謂的 downtime 不同,Rolling Update 則是會確保系統一直是可用的狀態
我們提到,多台機器逐步更新是這類操作的關鍵,因為有不同機器繼續撐著運行,在使用者的角度看來,系統依然是可用的
使用 Rolling Update 需要確保你的系統有做好 “向後相容” 或 “向前相容” 的設計
這樣才能確保在更新過程中,系統依然可以正常運行
在 Kubernetes 中,你可以透過設定 spec.strategy.type 來決定使用哪種策略
-
Recreate: 先砍再建 -
RollingUpdate: 邊建邊砍- 你也可以控制新舊 Pod 的數量,目的在於確保在更新過程中,系統依然可以正常運行
-
spec.strategy.rollingUpdate.maxSurge表示最多可以 比原本多出多少 Pod(預設 25%, 至多 125% 的 Pod 會是可用的) -
spec.strategy.rollingUpdate.maxUnavailable表示最多可以有多少 Pod 不可用(預設 25%, 至少 75% 的 Pod 會是可用的)
-
- 你也可以控制新舊 Pod 的數量,目的在於確保在更新過程中,系統依然可以正常運行
預設的策略會是
RollingUpdate
他執行起來會長這樣
你可以很清楚的看出他的差別,Rolling Update 的過程中,系統依然是可用的
而 Recreate 的過程中,系統是不可用的(全部都下去)
Recreate 即使下線的時間很短,仍然會造成影響,因此也視為有 downtime

Canary Deployment
基本上 Rolling Update 是相對常見的策略
逐步的更新你的服務,使得其永遠可用
Rolling Update 的 use case,比方説我公司內部開發機的更新就是直接 rolling 上去,反正掛了也是內部不可用而已
但這個可用其實是相對薄弱的
你的服務是起來的,並不代表他有好好工作
比方說,服務內部有一個 bug, 他並不會讓服務直接掛掉,但是會造成結果錯誤
這種時候如果 Liveness 以及 Readiness 沒有設定好,就會造成 silent error
這並不是我們樂見的
有關 Liveness 以及 Readiness 可以參考 Kubernetes 從零開始 - Self Healing 是如何運作的 | Shawn Hsu
我們當然不希望全部都上了之後才發現有問題
最簡單的就是分流囉,有多套版本的服務,一部分的人用新的,一部分的用舊的
少部分的人先使用新版本,如果都沒有問題,逐步開放至全部使用者 是 Canary Deployment 的精髓
所以同一時間會有不同版本的服務在線上,透過 分流機制 將部分使用者導向新版本
為了避免 silent error 這種事情,分流可以很好的限縮錯誤範圍,當發現新版本有問題,影響也會是最小的
同一時間多版本在線上服務,一個重點是要確保服務本身是 向後相容的
不然你的資料會損毀,而這是最不想發生的狀況
預先執行資料遷移是個選擇,或者是用 Blue Green Deployment 來達成
有關 data migration 可以參考 資料庫 - 新手做 Data Migration 資料遷移 | Shawn Hsu
Blue Green Deployment
他跟 Canary Deployment 類似都是使用多版本的部署策略
差別在於,Blue Green 是一瞬間切換的
他 並不是逐步更新,而是將流量瞬間切換到新版本的系統上
所以你其實沒辦法小規模測試
因為不想要有多個資料來源,所以 Blue Green 事實上是維護兩套完全獨立的系統
一套舊系統(Blue),一套新系統(Green),兩者獨立運行
等到你確定新版本沒問題之後,更改路由設定,將全部的流量都導入新版本
你可能會問,兩套系統運行,那資料要怎麼同步?
最終的目的都是減少 downtime, 而 Blue Green 的舊系統會繼續服務
為了新系統切換的時候資料是近新的,所以通常會用 Kafka 之類的進行資料同步
有關 Kafka 可以參考 資料庫 - 從 Apache Kafka 認識 Message Queue | Shawn Hsu
有關 data migration 可以參考 資料庫 - 新手做 Data Migration 資料遷移 | Shawn Hsu
A/B Testing
另外一種部署策略我覺得是比較特殊的
他的目的不在於發布新的系統,而是為了測試方面的部署策略
A/B Testing 的目的,是 藉由部署不同的系統版本,窺探使用者的反應
當然,還是有新版本的系統被部署,只是要注意他的本質是 測試
比方說,有新版本的 UI,你想要知道使用者對於新版本的 UI 的反應如何
所以可以將 Ingress 的流量分切,讓小部分的人體驗新功能,搭配個問卷調查之類的
- 8 成的人依舊是使用舊版本
- 而 2 成的人是使用新版本
當你測試完成之後,再把流量復原然後就可以根據測試結果決定後續
Shadow Deployment
Shadow 類似於 A/B Testing,只是他不需要分流
他也是用於測試,只不過是將 production 流量複製一份出來測試
這樣的好處就是你可以很直接的觀察新版本的表現,而 完全不會影響到舊版本
response 則會全部被丟棄
Conclusion
| Strategy | Recreate | Rolling Update | Blue Green Deployment | Canary Deployment | A/B Testing | Shadow Deployment |
|---|---|---|---|---|---|---|
| Purpose | 部署 | 部署 | 部署 | 部署 | 測試 | 測試 |
| Downtime | ||||||
| Risk Level | High | Medium | Low | Low | Low | Low |
| Rollback Difficulty | High | Medium | Low | Low | Low | Low |
| Release Unit | 完整服務 | 單台機器 | 兩個不同環境 | 部分流量 | 部分流量 | 複製流量 |
How Kubernetes Handle Deployment Strategy
上述我們提到的部署策略中,有一些是同時部署兩個版本然後透過分流的方式達成
在 Kubernetes 中,如果不考慮其他的工具,基本上依靠 Service 就可以做到八成像了
1
2
3
4
5
6
7
8
9

name: frontend
replicas: 3
...
labels:
  app: guestbook
  tier: frontend
  track: stable
...
image: gb-frontend:v3
1
2
3
4
5
6
7
8
9

name: frontend-canary
replicas: 1
...
labels:
  app: guestbook
  tier: frontend
  track: canary
...
image: gb-frontend:v4
上述兩個不同的 Deployment 分別對應到新舊版本的應用程式(v3 以及 v4)
然後在 label 的部分,你可以看到他有共享相同的 label(i.e. frontend 以及 guestbook)
在 Service 的部分就可以使用這些相同的 label 選取
就能夠達成基本的分流,以 replica 的數量來判斷就是 3:1 的流量
1
2
3

selector:
   app: guestbook
   tier: frontend
Argo Rollouts
就如同我們上述討論的,Kubernetes 內建的 Rollout 功能雖然強大但是仍然有許多改進空間
比如說
- 沒辦法控制 Rollout 的速度
- Liveness 以及 Readiness 沒辦法做更深度且全面的檢查
- 沒辦法依靠外部 Metrics 衡量更新
基於以上考量點,實務上在正式環境內部還是有太多的隱患存在
所以 Argo Rollouts 正是為了解決以上痛點而誕生的
本質上也是透過 Kubernetes Controller 以及 CRD 來實現的
比如說 Rollout CRD 就是 Deployment 的包裝,並且額外提供了一些功能
前面提到 Blue Green Deployment 以及 Canary Deployment 都是有支援的,但是也只支援這兩個
有關 CRD 可以參考 Kubernetes 從零開始 - client-go 實操 CRD | Shawn Hsu
有關 Kubernetes Controller 可以參考 Kubernetes 從零開始 - Informer 架構以及 Controller Pattern | Shawn Hsu
Architecture

ref: Architecture
基本上如果你熟悉 Kubernetes Controller 的運作方式,就不難理解
本質上,Controller 會監聽 Rollout CRD 的任何變化,並根據其內容調整相對應的資源
前面提到,雖然說他是包裝 Deployment,但是 Controller 並不會對原生 Deployment 有任何反應
有關 Kubernetes Controller 可以參考 Kubernetes 從零開始 - Informer 架構以及 Controller Pattern | Shawn Hsu
也跟 Deployment 一樣,底層 Argo Rollouts 會使用 ReplicaSet 來管理 Pod
為了能方便管理不同的版本,一些額外的 metadata 以及 labels 會被套用上去
並且需要搭配 Service 進行分流(Controller 會指派 unique hash 確保選擇到正確的 ReplicaSet),Service Mesh 或者 Ingress 的 solution 如 Traefik、Nginx Ingress Controller 或 Istio 等等也可以搭配使用
另外你也可以將 Metrics 整合進來,檢查 Rollout 的狀態
Rollout CRD
1
2
3
4
5
6
7
8
9
10
11
12
13
14
15
16
17
18
19
20
21
22
23
24
25
26
27
28
29
30
31
32
33
34
35
36
37
38
39
40
41
42
43
44
45
46
47
48
49
50
51
52
53
54
55
56
57
58
59
60
61
62
63
64
65
66
67
68
69
70
71
72
73
74
75
76
77
78
79
80
81
82
83
84
85
86
87
88
89
90
91
92
93
94
95
96
97
98
99
100
101
102
103
104
105
106
107
108
109
110
111
112
113
114
115
116
117
118
119
120
121
122
123
124
125
126
127
128
129
130
131
132
133
134
135
136
137
138
139
140
141
142
143
144
145
146
147
148
149
150
151
152
153
154
155
156
157
158
159
160
161
162
163
164
165
166
167
168
169
170
171
172
173
174
175
176
177
178
179
180
181
182
183
184
185
186
187
188
189
190
191
192
193
194
195
196
197
198
199
200
201
202
203
204
205
206
207
208
209
210
211
212
213
214
215
216
217
218
219
220
221
222
223
224
225
226
227
228
229
230
231
232
233
234
235
236
237
238
239
240
241
242
243
244
245
246
247
248
249
250
251
252
253
254
255
256
257
258
259
260
261
262
263
264
265
266
267
268
269
270
271
272
273
274
275
276
277
278
279
280
281
282
283
284
285
286
287
288
289
290
291
292
293
294
295
296
297
298
299
300
301
302
303
304
305
306
307
308
309
310
311
312
313
314
315
316
317
318
319
320
321
322
323
324
325
326
327
328
329
330
331
332
333
334
335
336
337
338
339
340
341
342
343
344
345
346
347
348
349
350
351
352
353
354
355
356
357
358
359
360
361
362
363
364
365
366
367
368
369
370
371
372
373
374
375
376
377
378
379
380
381
382
383
384
385
386
387
388
389
390
391
392
393
394
395
396
397
398
399
400
401
402
403
404
405
406
407
408
409
410
411
412
413
414
415
416
417
418
419
420
421
422
423
424
425
426
427
428
429
430
431
432
433
434
435
436
437
438
439
440
441
442
443
444
445
446
447
448
449
450
451
452
453
454
455
456
457
458
459
460
461
462
463
464
465
466
467
468
469
470

apiVersion: argoproj.io/v1alpha1
kind: Rollout
metadata:
  name: example-rollout-canary
spec:
  # Number of desired pods.
  # Defaults to 1.
  replicas: 5
  analysis:
    # limits the number of successful analysis runs and experiments to be stored in a history
    # Defaults to 5.
    successfulRunHistoryLimit: 10
    # limits the number of unsuccessful analysis runs and experiments to be stored in a history.
    # Stages for unsuccessful: "Error", "Failed", "Inconclusive"
    # Defaults to 5.
    unsuccessfulRunHistoryLimit: 10

  # Label selector for pods. Existing ReplicaSets whose pods are selected by
  # this will be the ones affected by this rollout. It must match the pod
  # template's labels.
  selector:
    matchLabels:
      app: guestbook

  # WorkloadRef holds a references to a workload that provides Pod template
  # (e.g. Deployment). If used, then do not use Rollout template property.
  workloadRef:
    apiVersion: apps/v1
    kind: Deployment
    name: rollout-ref-deployment
    # Specifies if the workload (Deployment) is scaled down after migrating to Rollout.
    # The possible options are:
    # "never": the Deployment is not scaled down
    # "onsuccess": the Deployment is scaled down after the Rollout becomes healthy
    # "progressively": as the Rollout is scaled up the Deployment is scaled down
    # If the Rollout fails the Deployment will be scaled back up.
    scaleDown: never|onsuccess|progressively

  # Template describes the pods that will be created. Same as deployment.
  # If used, then do not use Rollout workloadRef property.
  template:
    spec:
      containers:
        - name: guestbook
          image: argoproj/rollouts-demo:blue

  # Minimum number of seconds for which a newly created pod should be ready
  # without any of its container crashing, for it to be considered available.
  # Defaults to 0 (pod will be considered available as soon as it is ready)
  minReadySeconds: 30

  # The number of old ReplicaSets to retain.
  # Defaults to 10
  revisionHistoryLimit: 3

  # Pause allows a user to manually pause a rollout at any time. A rollout
  # will not advance through its steps while it is manually paused, but HPA
  # auto-scaling will still occur. Typically not explicitly set the manifest,
  # but controlled via tools (e.g. kubectl argo rollouts pause). If true at
  # initial creation of Rollout, replicas are not scaled up automatically
  # from zero unless manually promoted.
  paused: true

  # The maximum time in seconds in which a rollout must make progress during
  # an update, before it is considered to be failed. Argo Rollouts will
  # continue to process failed rollouts and a condition with a
  # ProgressDeadlineExceeded reason will be surfaced in the rollout status.
  # Note that progress will not be estimated during the time a rollout is
  # paused.
  # Defaults to 600s
  progressDeadlineSeconds: 600

  # Whether to abort the update when ProgressDeadlineSeconds is exceeded.
  # Optional and default is false.
  progressDeadlineAbort: false

  # UTC timestamp in which a Rollout should sequentially restart all of
  # its pods. Used by the `kubectl argo rollouts restart ROLLOUT` command.
  # The controller will ensure all pods have a creationTimestamp greater
  # than or equal to this value.
  restartAt: '2020-03-30T21:19:35Z'

  # The rollback window provides a way to fast track deployments to
  # previously deployed versions.
  # Optional, and by default is not set.
  rollbackWindow:
    revisions: 3

  strategy:
    # Blue-green update strategy
    blueGreen:
      # Reference to service that the rollout modifies as the active service.
      # Required.
      activeService: active-service

      # Pre-promotion analysis run which performs analysis before the service
      # cutover. +optional
      prePromotionAnalysis:
        templates:
          - templateName: success-rate
        args:
          - name: service-name
            value: guestbook-svc.default.svc.cluster.local

      # Post-promotion analysis run which performs analysis after the service
      # cutover. +optional
      postPromotionAnalysis:
        templates:
          - templateName: success-rate
        args:
          - name: service-name
            value: guestbook-svc.default.svc.cluster.local

      # Name of the service that the rollout modifies as the preview service.
      # +optional
      previewService: preview-service

      # The number of replicas to run under the preview service before the
      # switchover. Once the rollout is resumed the new ReplicaSet will be fully
      # scaled up before the switch occurs +optional
      previewReplicaCount: 1

      # Indicates if the rollout should automatically promote the new ReplicaSet
      # to the active service or enter a paused state. If not specified, the
      # default value is true. +optional
      autoPromotionEnabled: false

      # Automatically promotes the current ReplicaSet to active after the
      # specified pause delay in seconds after the ReplicaSet becomes ready.
      # If omitted, the Rollout enters and remains in a paused state until
      # manually resumed by resetting spec.Paused to false. +optional
      autoPromotionSeconds: 30

      # Adds a delay before scaling down the previous ReplicaSet. If omitted,
      # the Rollout waits 30 seconds before scaling down the previous ReplicaSet.
      # A minimum of 30 seconds is recommended to ensure IP table propagation
      # across the nodes in a cluster.
      scaleDownDelaySeconds: 30

      # Limits the number of old RS that can run at once before getting scaled
      # down. Defaults to nil
      scaleDownDelayRevisionLimit: 2

      # Add a delay in second before scaling down the preview replicaset
      # if update is aborted. 0 means not to scale down. Default is 30 second
      abortScaleDownDelaySeconds: 30

      # Anti Affinity configuration between desired and previous ReplicaSet.
      # Only one must be specified
      antiAffinity:
        requiredDuringSchedulingIgnoredDuringExecution: {}
        preferredDuringSchedulingIgnoredDuringExecution:
          weight: 1 # Between 1 - 100

      # activeMetadata will be merged and updated in-place into the ReplicaSet's spec.template.metadata
      # of the active pods. +optional
      activeMetadata:
        labels:
          role: active

      # Metadata which will be attached to the preview pods only during their preview phase.
      # +optional
      previewMetadata:
        labels:
          role: preview

    # Canary update strategy
    canary:
      # Reference to a service which the controller will update to select
      # canary pods. Required for traffic routing.
      canaryService: canary-service

      # Reference to a service which the controller will update to select
      # stable pods. Required for traffic routing.
      stableService: stable-service

      # Metadata which will be attached to the canary pods. This metadata will
      # only exist during an update, since there are no canary pods in a fully
      # promoted rollout.
      canaryMetadata:
        annotations:
          role: canary
        labels:
          role: canary

      # metadata which will be attached to the stable pods
      stableMetadata:
        annotations:
          role: stable
        labels:
          role: stable

      # The maximum number of pods that can be unavailable during the update.
      # Value can be an absolute number (ex: 5) or a percentage of total pods
      # at the start of update (ex: 10%). Absolute number is calculated from
      # percentage by rounding down. This can not be 0 if  MaxSurge is 0. By
      # default, a fixed value of 1 is used. Example: when this is set to 30%,
      # the old RC can be scaled down by 30% immediately when the rolling
      # update starts. Once new pods are ready, old RC can be scaled down
      # further, followed by scaling up the new RC, ensuring that at least 70%
      # of original number of pods are available at all times during the
      # update. +optional
      maxUnavailable: 1

      # The maximum number of pods that can be scheduled above the original
      # number of pods. Value can be an absolute number (ex: 5) or a
      # percentage of total pods at the start of the update (ex: 10%). This
      # can not be 0 if MaxUnavailable is 0. Absolute number is calculated
      # from percentage by rounding up. By default, a value of 1 is used.
      # Example: when this is set to 30%, the new RC can be scaled up by 30%
      # immediately when the rolling update starts. Once old pods have been
      # killed, new RC can be scaled up further, ensuring that total number
      # of pods running at any time during the update is at most 130% of
      # original pods. +optional
      maxSurge: '20%'

      # Adds a delay before scaling down the previous ReplicaSet when the
      # canary strategy is used with traffic routing (default 30 seconds).
      # A delay in scaling down the previous ReplicaSet is needed after
      # switching the stable service selector to point to the new ReplicaSet,
      # in order to give time for traffic providers to re-target the new pods.
      # This value is ignored with basic, replica-weighted canary without
      # traffic routing.
      scaleDownDelaySeconds: 30

      # The minimum number of pods that will be requested for each ReplicaSet
      # when using traffic routed canary. This is to ensure high availability
      # of each ReplicaSet. Defaults to 1. +optional
      minPodsPerReplicaSet: 2

      # Limits the number of old RS that can run at one time before getting
      # scaled down. Defaults to nil
      scaleDownDelayRevisionLimit: 2

      # Background analysis to run during a rollout update. Skipped upon
      # initial deploy of a rollout. +optional
      analysis:
        templates:
          - templateName: success-rate
        args:
          - name: service-name
            value: guestbook-svc.default.svc.cluster.local

          # valueFrom.podTemplateHashValue is a convenience to supply the
          # rollouts-pod-template-hash value of either the Stable ReplicaSet
          # or the Latest ReplicaSet
          - name: stable-hash
            valueFrom:
              podTemplateHashValue: Stable
          - name: latest-hash
            valueFrom:
              podTemplateHashValue: Latest

          # valueFrom.fieldRef allows metadata about the rollout to be
          # supplied as arguments to analysis.
          - name: region
            valueFrom:
              fieldRef:
                fieldPath: metadata.labels['region']

      # Steps define sequence of steps to take during an update of the
      # canary. Skipped upon initial deploy of a rollout. +optional
      steps:
        # Sets the ratio of canary ReplicaSet to 20%
        - setWeight: 20

        # Pauses the rollout for an hour. Supported units: s, m, h
        - pause:
            duration: 1h

        # Pauses indefinitely until manually resumed
        - pause: {}

        # set canary scale to an explicit count without changing traffic weight
        # (supported only with trafficRouting)
        - setCanaryScale:
            replicas: 3

        # set canary scale to spec.Replica * (setweight / maxTrafficWeight) without changing traffic weight
        # if maxTrafficWeight unspecified, it defaults to 100
        # (supported only with trafficRouting)
        - setCanaryScale:
            weight: 25

        # set canary scale to match the canary traffic weight (default behavior)
        - setCanaryScale:
            matchTrafficWeight: true

        # The percentage or number of replica pods within the applications ReplicaSet
        # that are available and ready when a rollout is ready to be promoted. Useful if your application
        # configured an HPA to help handle different loads of traffic, but you still want quick promotions.
        # Defaults to 100% if replicaProgressThreshold is not specified.
        # The 'type' field should be either "Percent" | "Pod"
        # Current percentage that is checked against the input percent value is calculated by the following:
        # CURRENT PERCENTAGE = available replicas / desired replicas for the current step
        # +optional
        - replicaProgressThreshold:
            type: Percent
            value: 90


        # executes the configured plugin by name with the provided configuration
        - plugin:
            name: example
            config:
              key: value

        # Sets header based route with specified header values
        # Setting header based route will send all traffic to the canary for the requests
        # with a specified header, in this case request header "version":"2"
        # (supported only with trafficRouting, for Istio only at the moment)
        - setHeaderRoute:
            # Name of the route that will be created by argo rollouts this must also be configured
            # in spec.strategy.canary.trafficRouting.managedRoutes
            name: 'header-route-1'
            # The matching rules for the header route, if this is missing it acts as a removal of the route.
            match:
              # headerName The name of the header to apply the match rules to.
              - headerName: 'version'
                # headerValue must contain exactly one field of exact, regex, or prefix. Not all traffic routers support
                # all types
                headerValue:
                  # Exact will only match if the header value is exactly the same
                  exact: '2'
                  # Will match the rule if the regular expression matches
                  regex: '2.0.(.*)'
                  # prefix will be a prefix match of the header value
                  prefix: '2.0'

          # Sets up a mirror/shadow based route with the specified match rules
          # The traffic will be mirrored at the configured percentage to the canary service
          # during the rollout
          # (supported only with trafficRouting, for Istio only at the moment)
        - setMirrorRoute:
            # Name of the route that will be created by argo rollouts this must also be configured
            # in spec.strategy.canary.trafficRouting.managedRoutes
            name: 'header-route-1'
            # The percentage of the matched traffic to mirror to the canary
            percentage: 100
            # The matching rules for the header route, if this is missing it acts as a removal of the route.
            # All conditions inside a single match block have AND semantics, while the list of match blocks have OR semantics.
            # Each type within a match (method, path, headers) must have one and only one match type (exact, regex, prefix)
            # Not all match types (exact, regex, prefix) will be supported by all traffic routers.
            match:
              - method: # What HTTP method to match
                  exact: 'GET'
                  regex: 'P.*'
                  prefix: 'POST'
                path: # What HTTP url paths to match.
                  exact: '/test'
                  regex: '/test/.*'
                  prefix: '/'
                headers:
                  agent-1b: # What HTTP header name to use in the match.
                    exact: 'firefox'
                    regex: 'firefox2(.*)'
                    prefix: 'firefox'

        # an inline analysis step
        - analysis:
            templates:
              - templateName: success-rate

        # an inline experiment step
        - experiment:
            duration: 1h
            templates:
              - name: baseline
                specRef: stable
                # optional, creates a service for the experiment if set
                service:
                  # optional, service: {} is also acceptable if name is not included
                  name: test-service
              - name: canary
                specRef: canary
                # optional, set the weight of traffic routed to this version
                weight: 10
            analyses:
              - name: mann-whitney
                templateName: mann-whitney
                # Metadata which will be attached to the AnalysisRun.
                analysisRunMetadata:
                  labels:
                    app.service.io/analysisType: smoke-test
                  annotations:
                    link.argocd.argoproj.io/external-link: http://my-loggin-platform.com/pre-generated-link

      # Anti-affinity configuration between desired and previous ReplicaSet.
      # Only one must be specified.
      antiAffinity:
        requiredDuringSchedulingIgnoredDuringExecution: {}
        preferredDuringSchedulingIgnoredDuringExecution:
          weight: 1 # Between 1 - 100

      # Traffic routing specifies the ingress controller or service mesh
      # configuration to achieve advanced traffic splitting. If omitted,
      # will achieve traffic split via a weighted replica counts between
      # the canary and stable ReplicaSet.
      trafficRouting:
        # Supports nginx and plugins only: This lets you control the denominator or total weight of traffic.
        # The total weight of traffic. If unspecified, it defaults to 100
        maxTrafficWeight: 1000
        # This is a list of routes that Argo Rollouts has the rights to manage it is currently only required for
        # setMirrorRoute and setHeaderRoute. The order of managedRoutes array also sets the precedence of the route
        # in the traffic router. Argo Rollouts will place these routes in the order specified above any routes already
        # defined in the used traffic router if something exists. The names here must match the names from the
        # setHeaderRoute and setMirrorRoute steps.
        managedRoutes:
          - name: set-header
          - name: mirror-route
        # Istio traffic routing configuration
        istio:
          # Either virtualService or virtualServices can be configured.
          virtualService:
            name: rollout-vsvc # required
            routes:
              - primary # optional if there is a single route in VirtualService, required otherwise
          virtualServices:
            # One or more virtualServices can be configured
            - name: rollouts-vsvc1 # required
              routes:
                - primary # optional if there is a single route in VirtualService, required otherwise
            - name: rollouts-vsvc2 # required
              routes:
                - secondary # optional if there is a single route in VirtualService, required otherwise

        # NGINX Ingress Controller routing configuration
        nginx:
          # Either stableIngress or stableIngresses must be configured, but not both.
          stableIngress: primary-ingress
          stableIngresses:
            - primary-ingress
            - secondary-ingress
            - tertiary-ingress
          annotationPrefix: customingress.nginx.ingress.kubernetes.io # optional
          additionalIngressAnnotations: # optional
            canary-by-header: X-Canary
            canary-by-header-value: iwantsit
          canaryIngressAnnotations: # optional
            my-custom-annotation.mygroup.com/key: value

        # ALB Ingress Controller routing configuration
        alb:
          ingress: ingress # required
          servicePort: 443 # required
          annotationPrefix: custom.alb.ingress.kubernetes.io # optional

        # Service Mesh Interface routing configuration
        smi:
          rootService: root-svc # optional
          trafficSplitName: rollout-example-traffic-split # optional

      # Add a delay in second before scaling down the canary pods when update
      # is aborted for canary strategy with traffic routing (not applicable for basic canary).
      # 0 means canary pods are not scaled down. Default is 30 seconds.
      abortScaleDownDelaySeconds: 30

      # Automatically reduce the number of stable pods as the number of canary pods increases
      # Only available when traffic routing is used. Default value is false meaning that as more canary pods
      # are created the number of stable pods stays the same.
      dynamicStableScale: false

status:
  pauseConditions:
    - reason: StepPause
      startTime: 2019-10-00T1234
    - reason: BlueGreenPause
      startTime: 2019-10-00T1234
    - reason: AnalysisRunInconclusive
      startTime: 2019-10-00T1234
Blue Green and Canary Deployment
一切都始於使用者發出指令(i.e. 更新 Rollout CRD),要求進行上版
針對 Blue Green Deployment
activeService 以及 previewService 會是這次更新過程中的主要角色
一開始
-
activeService會指向 revision 1 RS -
previewService會指向 revision 1 RS
然後開始進行更新,revision 2 RS 建立
-
activeService會指向 revision 1 RS -
previewService會指向 revision 2 RS
在 Blue Green 中,previewService 是類似於 funnel traffic(漏斗流量)
當 revision 2 RS 已經準備好了
就會開始執行 prePromotionAnalysis 執行升級檢查
在正式 “promotion” 之前,你可以讓他先暫停一下(e.g. autoPromotionEnabled 以及 autoPromotionSeconds)
進到 promotion 階段就是將 activeService 指向 revision 2 RS
最後就剩下 postPromotionAnalysis 再次執行升級檢查
而 Canary Deployment 比較不一樣
因為說實在的,他並沒有一個統一的做法
所以 Argo Rollouts 針對 Canary 反而是讓你自定義他該怎麼做
1
2
3
4
5
6
7
8
9
10
11
12
13

strategy:
  canary:
    steps:
    - setWeight: 20
    - pause: {}
    - setWeight: 40
    - setCanaryScale:
      replicas: 3
    - pause: { duration: 1m }
    - setWeight: 60
    - pause: { duration: 1h }
    - setWeight: 80
    - pause: { duration: 30m }
如果沒有指定 steps,就會 fallback 到 Rolling update
透過一系列的 steps 來控制 canary 該怎麼執行
所以上述可以這樣理解
- 設定 canary 吃 20% 的流量
- 等待直到手動恢復
- 設定 canary 吃 40% 的流量
- 調整 canary replicas 的數量到 3(他並不會影響流量佔比)
- … 以此類推
HPA and VPA
Rollout CRD 都可以跟現有的 HorizontalPodAutoscaler 以及 VerticalPodAutoscaler 相容
主要的原因在於 Argo Rollouts v0.3.0 有揭露 /scale 這個 subresource(跟原本的 Kubernetes Deployment 相同)
也因為如此,HPA 可以透過 /scale 讀取 current replicas(從 scale subresource 取得)並與 status.replicas 比較來決定要如何調整
以前是 HPA ➡️ replica set
現在是 HPA ➡️ Rollout ➡️ replica set
有了 Rollout 這層包裝,replica set 的操作就會落到 Rollout Controller 的身上
決定數量依然是 HPA 的責任,Argo Rollouts 則負責實際的調整
1
2
3
4
5
6
7
8
9
10
11
12
13
14

apiVersion: autoscaling/v2
kind: HorizontalPodAutoscaler
metadata:
  name: demo-hpa
  labels:
    app: demo
spec:      # The min and max number of pods the HPA can scale
  minReplicas: 1
  maxReplicas: 10
  scaleTargetRef:       # The HPA targets the Rollout object for scaling.
    apiVersion: argoproj.io/v1alpha1
    kind: Rollout
    name: rollout-hpa-example
...
VPA 也是可以照 HPA 的寫法,只不過官方文件並未說明是否也是因為
/scalesubresource 的關係
1
2
3
4
5
6
7
8
9
10
11
12
13

apiVersion: "autoscaling.k8s.io/v1beta2"
kind: VerticalPodAutoscaler
metadata:
  name: vpa-rollout-example
  namespace: test-vpa
spec:
  targetRef:
    apiVersion: "argoproj.io/v1alpha1"
    kind: Rollout
    name: vpa-demo-rollout
  updatePolicy:
    updateMode: "Auto"
...
References
- Autoscaling Workloads
- Managing Workloads
- Software — 軟體版本Canary是什麼意思?
- Day08 - 使用 Kubernetes 實現藍綠部屬 (Blue/Green Deployment)
- 從異世界歸來的第十三天 - Kubernetes Deployment Strategies - Rolling Update & Recreate (二)
- 從異世界歸來的第十四天 - Kubernetes Deployment Strategies - Blue/Green Deployment 藍綠部署 (三)
- 從異世界歸來的第十五天 - Kubernetes Deployment Strategies - Canary Deployment 金絲雀部署 (四)
- Resize CPU and Memory Resources assigned to Containers
- Horizontal Pod Autoscaling
- Node Autoscaling
- Configure Quality of Service for Pods
- KEDA Concepts
- HorizontalPodAutoscaler Walkthrough
- ⎈ Rolling Update & Recreate Deployment Strategies in Kubernetes ⚙️
- Day 29: Kubernetes A/B Testing
- Managing Workloads
- Horizontal Pod Autoscaling
- BlueGreen Deployment Strategy
- Canary Deployment Strategy
- Smarter Live Streaming at Scale: Rolling Out VBR for All Netflix Live Events
- What is Nominal bit rate?
Leave a comment