網頁程式設計三兩事 - Keycloak 系統,身份認證以及授權框架
Authorization vs. Authentication
這兩個概念很容易搞混,他分別指的是
- Authentication 驗證你是誰
- Authorization 確認你能做什麼
在操作一個系統中,你一定是會先過 Authentication 再來才是 Authorization
Authentication
Authentication 驗證身份的部分很好理解
最常見的方式就是 帳號密碼 驗證
那其實也有其他種方法,像是智慧型手機常用的臉部辨識,指紋辨識也都是可以用來驗證身份
總之就是要確定你是誰
Authorization
Authorization 是確定你能做什麼
那他的判斷方式,看你怎麼做
比如說我們之前在 網頁程式設計三兩事 - 基礎權限管理 RBAC, ABAC 與 PBAC | Shawn Hsu 討論的各種權限管理的機制
你可以利用基本的 ACL,甚至是 RBAC, PBAC 以及 ABAC 進行設計
OAuth 2.0
講到 authz(Authorization),那就不得不提 OAuth 2.0
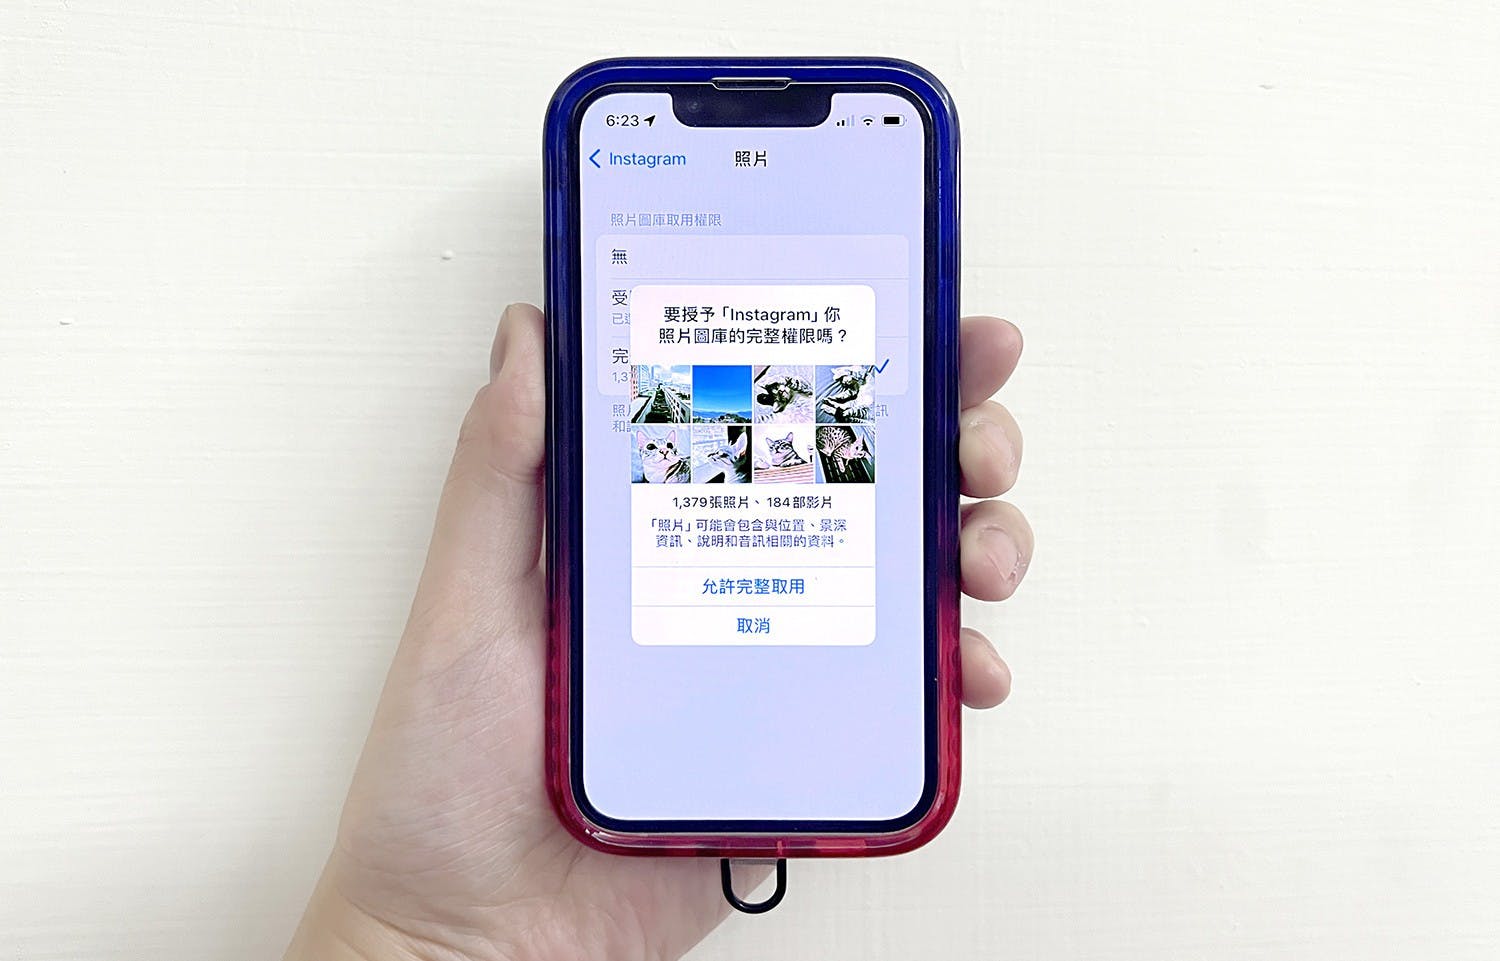
一切始於人們對於應用程式功能的追求
比方說你想要讓 Instagram 存取 Google 相簿,讓你可以發文分享今天去哪裡玩
早期,這是無法達成的,或者說技術上可行但是風險極大
兩個不同系統(A 與 B)要互相存取,尤其只有部分授權資料
做法只有將 B 系統的 credential 存入 A 系統內,當需要的時候讓他自己去抓
這會有問題
- 把系統 credential 放在別的系統,本身就是個大問題
- 即使他能夠存取,你也沒辦法控制他到底能夠拿到多少東西
這些技術上的限制,催生出了 OAuth 2.0,也就是 RFC 6749
講到這其實我很好奇,因為把 credential 放在別的系統這件事情實務上真的會做
比方說,我之前做過,在產品內留存某設備的登入 credential,目的在於取得設備的 log 拉回到產品內部進行整合
那為什麼同一個概念這邊不行 那邊可以?
原因在於,系統之間是不是 互相信任的
不過即使是這種情況,你也可以把帳號權限開很低
以我的例子來說,兩邊的系統都是互相信任的,都是你的
所以把 credential 放那邊是還好
但是 Instagram 存取本機相簿這件事情,你信任他嗎? 其實不好說
畢竟那個系統不是你寫的,你不知道他會做什麼,基於這個隱憂,你不應該把 credential 放他那
那怎麼辦?
OAuth 2.0 的做法是給予 access token
利用 access token 向第三方授權特定資源存取權
How Access Token Works
token 包含了
- 可以存取 的範圍(e.g. 你的電話號碼,住址 … etc.)
- token 的有效期限
OAuth 人物簡介
- Resource Owner
 user(i.e. 你)
 - Client 欲取得你的授權拿資料的 application
- Authorization Server 驗證身份,並生成授權訪問 token 給 client
- Resource Server 儲存用戶機密資料的伺服器, client 必須帶著 token 才能存取
整個 OAuth 的 flow 大致如下
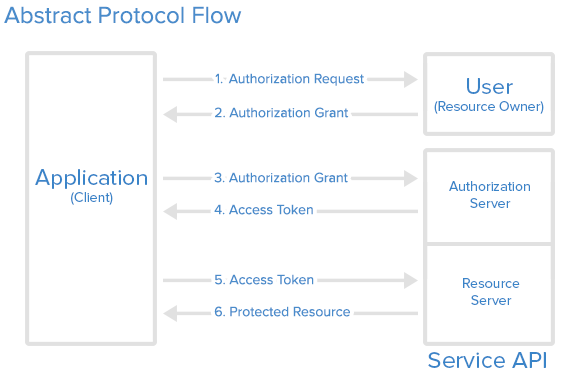
可以看到,client 先從 resource owner 這裡取得 授權
通常在這個步驟就會明確的指定可以存取的範圍
得到使用者的同意之後就會帶著 grant 向 authorization server 進行存取授權
拿到 token 之後就可以帶著去 resource server 拿資料了
Authorization Grant Type
Authorization grant 是一種 credential, 代表 resource owner 核可的授權
與上面講的傳統 client server 的 credential 不同
這裡的 credential 不會包含任何密碼什麼的,也就不會有任何洩漏機密資訊的風險
分為四種
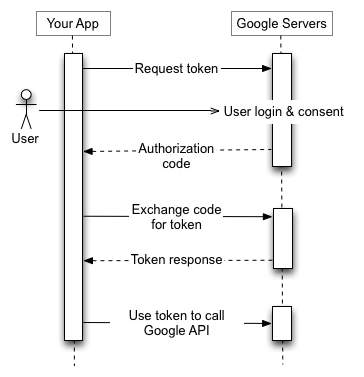
Authorization Code
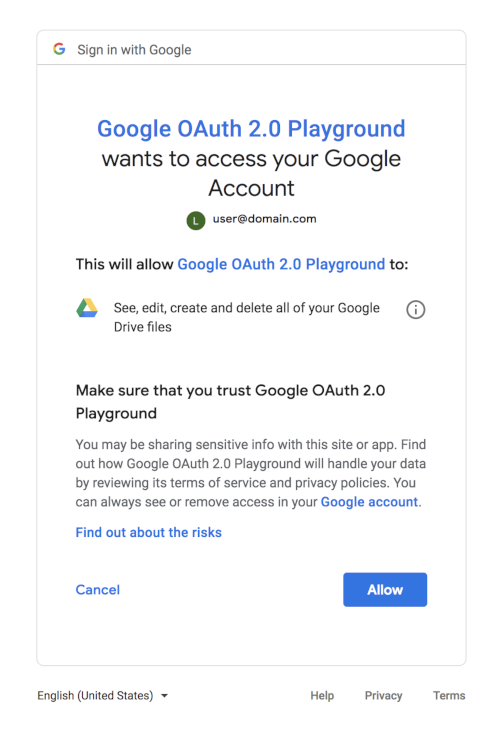
ref: OpenID Connect
藉由將使用者導向 authorization server 的一種方法
當操作完成之後,你的 client 端會拿到一串 authorization code
你就可以使用這個 token 對去找 authorization server 換 access token
然後你就可以拿著 access token 去找 resource server 進行一系列的存取操作
上圖的 Google OAuth 2.0 API 就是一個很好的例子
Implicit
已經不推薦使用了
這個方法,client 會直接取得 access token
而且不會經過任何驗證
Resource Owner Password Credentials
已經不推薦使用了
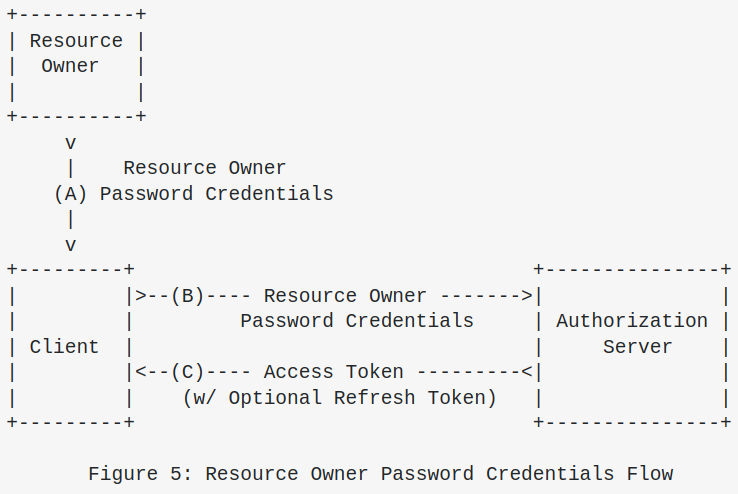
顧名思義,使用 resource owner 的 credential(i.e. user id and password)
但它並不是把你的 credential 儲存起來
而是拿你的 password 跟 authorization server 換一個 access token
不推薦的原因是因為 OAuth Framework 是基於第三方存取而考量的
當然如果要你直接把密碼給第三方做驗證是我也不想
實務上,自己的網頁前後端用這種方法是 ok 的
spec 裡面有提到,除非 resource owner 跟 client 之間高度信任,否則不要使用這個方法
Client Credentials
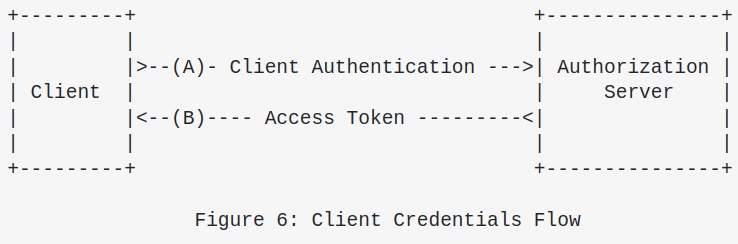
長的跟 Resource Owner Password Credentials 很像
但不同的是,它 不需要 user 的 credential
Token Safer than Credential?
給 token 安全? 還不是機密資料,差在哪?
- 傳統 credential 沒辦法很細緻的控制權限,給出去就都完了
- 如果被攻擊,密碼登入那種改密碼需要時間,駭客能使用的時間會變得更久,但
token可以在授權方馬上 revoke -
token是會有期限的,你的 credential 可沒有 - 你的 credential 永遠不會到第三方手上
等於說,OAuth 2.0 標準把所有風險都降到最低
最壞的狀況也就是被拿去亂用,不過因為 expire 以及即時 revoke 的機制可以將危險降至最低
What is OAuth 2.0 Exactly
講了那麼多,其實 OAuth 2.0 就只是一個授權框架
他定義了系統之間如何用什麼 “標準” 的流程進行授權
OpenID Connect(OIDC)
Pseudo Authentication
OAuth 2.0 解決了密碼交給第三方的問題,透過引入標準流程,以更高強度的方式進行授權
Authenticating resource owners to clients is out of scope for this specification. Any specification that uses the authorization process as a form of delegated end-user authentication to the client (e.g., third-party sign-in service) MUST NOT use the implicit flow without additional security mechanisms that would enable the client to determine if the access token was issued for its use (e.g., audience-restricting the access token).
也就是說,OAuth 2.0 流程只是授權過程,他不處理 authentication
任何持有 token 的人都可以要求資源(i.e. Bearer Token)
在當時的時空背景下,很不幸的 OAuth 2.0 仍然被亂用成身份認證的工具
這種方法被稱作 Pseudo Authentication
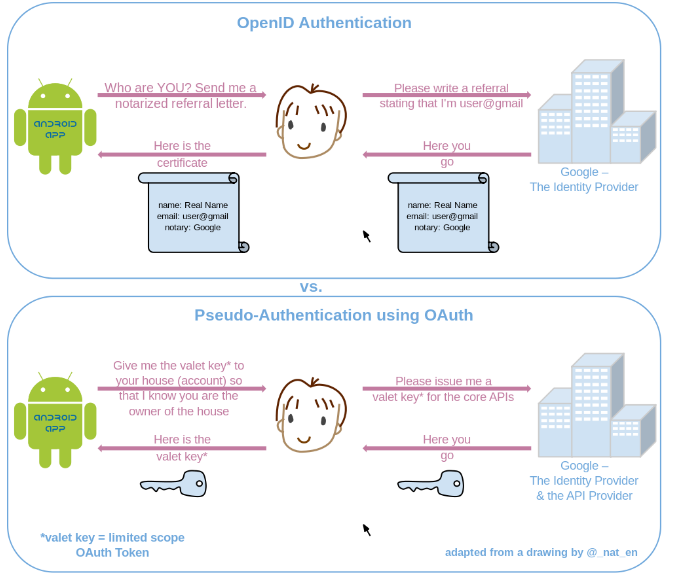
ref: 開發觀念建置-關於身分識別授權流程
圖片中就是個很好的例子
第三方 app 用 OAuth 2.0 取得 access token
然後因為你有辦法取得 access token 並且他也是正確的,我就覺得你有權限
這很荒謬,就像前面提到的,token 是不看人的,也就是說誰擁有 token 誰就有權力
問題是你沒辦法確認這個 token 不是被偷來的,你不能因為它有 token 就認為一定是本人在操作
這也是規格書裡面提到,MUST NOT use the implicit flow without additional security mechanisms
所以為了杜絕這種亂用,OpenID Connect 被提出
在 abstract 他就很直接的寫
OpenID Connect 1.0 is a simple identity layer on top of the OAuth 2.0 protocol. It enables Clients to verify the identity of the End-User based on the authentication performed by an Authorization Server, as well as to obtain basic profile information about the End-User in an interoperable and REST-like manner.
OIDC 是在 OAuth 2.0 之上的 identity layer
因為 OAuth 2.0 本身不負責身份認證,OIDC 就是補齊這部分
在 Authorization Request 內帶入 openid scope value, 系統就會知道說,你不只是單純想要進行授權,你還想要做身份認證
所以回傳的部分會額外多一個 ID Token(以 JWT 的形式),這個 ID Token 就是身份認證之後的結果
Identity and Access Management(IAM)
當企業規模逐漸壯大,如何管理身份與權限是一大問題
如果每個部門各做各的系統,那流程肯定是混亂並且不容易維護的
包含像是
- 帳號建立與停用,流程應該怎麼走
- 帳號的活動紀錄是不是要留存
- 哪些資源是可以存取哪些不行
Keycloak
所以市面上就會有像 Keycloak 這樣的 IAM 解決方案
支援 OAuth 2.0, OIDC 以及 Single Sign On 等等的(甚至還有 social login 呢)
那老實說,我其實最好奇的是他的 Single Sign On 的功能
在開始之前,還是有些東西需要先知道,比如說他的 授權模型
Authorization Model
網頁程式設計三兩事 - 基礎權限管理 RBAC, ABAC 與 PBAC | Shawn Hsu 我們講了三種授權模型,而 Keycloak 本身,是都支援的
RBAC
舉例來說,RBAC 在 Keycloak 裡的實現有
-
roles: 比如說 Admin, Member … etc. -
composite roles: 就是可以有多個role的一種複合角色,例如 Super Admin = Sales Admin + Dev Admin -
client role,group role: 你可以將role接到client或是group上面
那 client 是什麼?
定義上是指,一個想要使用 Keycloak 去對使用者做身份認證的實體
那這個實體,多半時候指的是 application 或 service
就是說,你自己有一個 SAAS 服務,然後你想要用 Keycloak 幫你管使用者,那 SAAS 就是那個實體
怎麼連接呢? 官方有提供 client-adapters 可以使用
group 就很簡單了
與其每個使用者都直接對到 roles,你會做一層抽象層方便管理
就會是 User Group Roles
ABAC
而 ABAC 的實現主要依靠 attributes
attributes 可以套用在 user 或者是 group 上面
一樣的,這種是比較 fine-grained control 的部分
網路上大家對於這種細緻顆粒度的控制到底要放在哪裡有不同的意見,比如說
- 有的建議全部權限判斷都在 Keycloak 做
- 有的是說粗顆粒度的在 Keycloak,細顆粒度在系統內自己做
不論如何,Keycloak 提供了這些方法,就依照個人的使用情境做選擇
Single Sign On
Single Sign On 這個機制現在我們已經很熟了,你平常大概都用過了
比方說,假設你是用 Google 全家桶(包含什麼 日曆、雲端硬碟、email 等等)
他們全部都是獨立的產品系統,這時候如果每個都要登入,每個產品都要一個帳號顯然是不 user friendly 的
所以 Single Sign On 的機制就是讓你只需要 登入一次,便可以在所有相互信任的系統中暢通無阻
這是怎麼做到的?
最簡單的例如說都在同個網域底下透過 Cookie 之類的進行共享
又或者是用 Identity Federation 的方式進行
Identity Federation
Identity Federation 聯合身份,顧名思義,是透過兩個不同的實體進行身份認證
這兩個實體之間互相信任,一邊是 Identity Provider(IdP),一邊是 Service Provider(SP)
他會有一個獨立的驗證身份並配發通行證的服務,叫做 身份提供者(Identity Provider, IdP)
每個服務的身份認證授權都會移到 IdP 進行處理
然後 服務提供者(Service Provider, SP) 則是你想要登入的系統
SP 去跟 IdP 進行驗證,IdP 會給 SP 一個 token
SP 因為信任 IdP,所以會用 token 立馬幫你開個 shadow user 出來(i.e. JIT provisioning),讓你直接登入
當然,裡面的資料就是從 IdP 那邊拿來的
所以就是這樣達成 SSO(Single Sign On) 以及 SSO(Single Sign Out) 的
注意到他是可以跨系統的哦
User Federation
User Federation 聯合使用者也是類似的概念
只不過這個是,你的使用者存在其他地方,比方說 LDAP 或是 AD 等等
他是一個資料庫,而 Identity Federation 是身份認證的 “服務”
Keycloak Single Sign On
那在 Keycloak 裡面 Single Sign On 要怎麼做呢
其實就是簡單的利用 client 這個概念即可
我們說過,client 就是服務跟 Keycloak 溝通的橋樑
所以假設一家公司底下有多個產品,理論上你就會有多個 client
這時候離 Single Sign On 還差一個概念 realm
realm
realm 直翻是領域,這個領域管理著上述提到的 user, groups, roles 以及 credentials
使用者是綁定在 realm 之上的,而每個 realm 都是獨立的,換言之是 不互通 的
也就是說
1

在 realm A 的使用者 A 是不能在 realm B 登入的
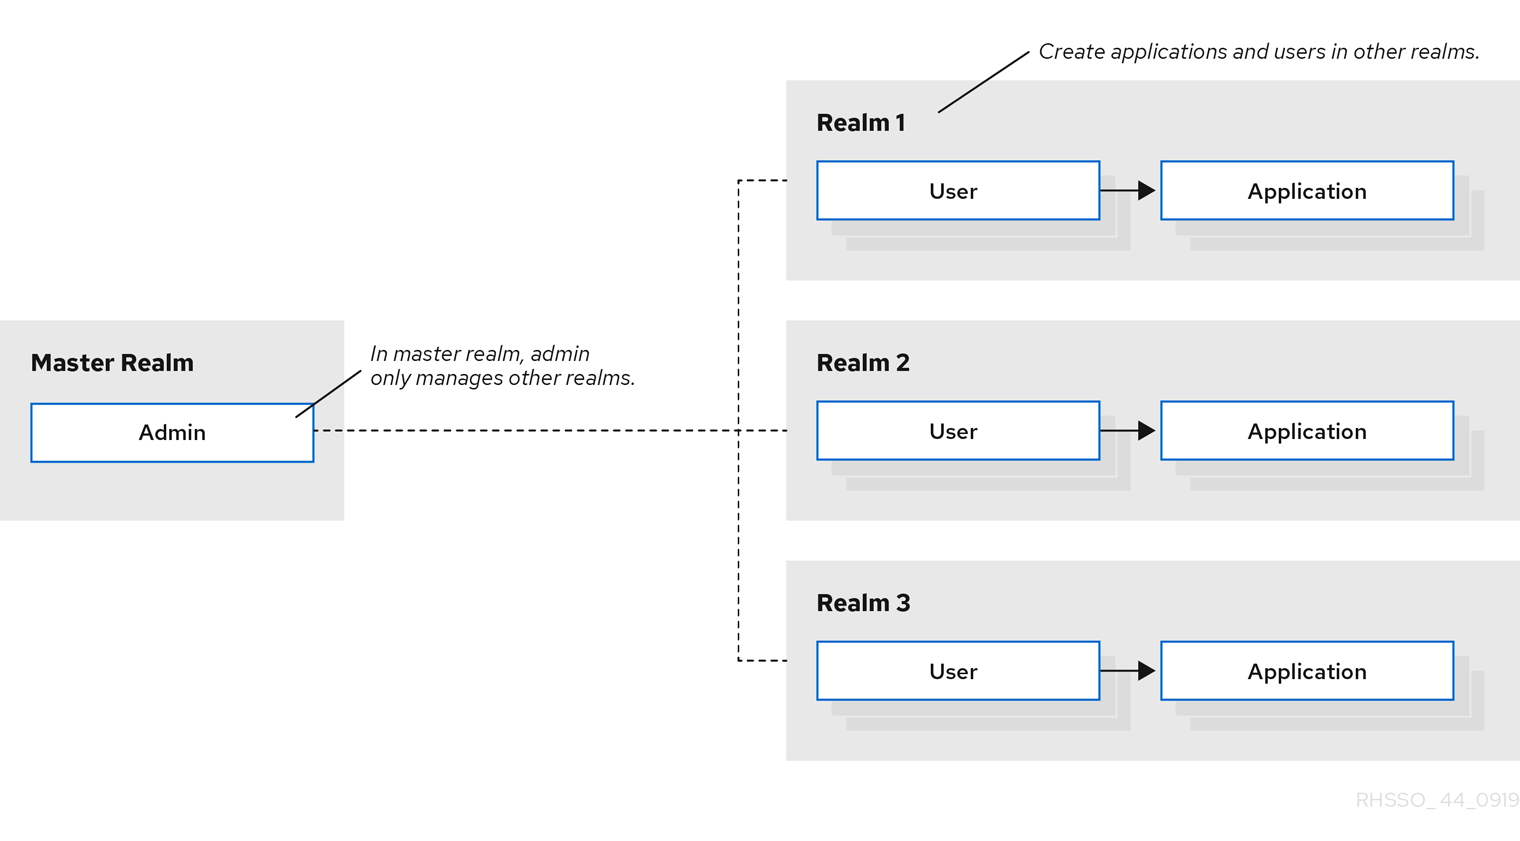
那分 realm 有什麼好處呢?
比方說,你可以建立兩個不同的 realm employee 以及 customer
-
employeerealm 底下的帳號就只能存取 internal company apps -
customerrealm 底下的帳號就只能存取 customer-facing apps
不同 realm 就不能做 SSO 了嗎?
你可以利用 Identity Federation 的方式進行
比方說employeerealm 以及customerrealm 同時都信任同一個IdP,那就可以做到 SSO 了
誒? 這樣就可以做到 Single Sign On 了嗎? 基本上是
一個 realm 底下的帳號都是互通的,我只要把 client 掛到 realm 底下
開通權限,基本上 realm 下的 app 我都能夠存取了
client
官方文件對於 realm 與 client 的關係著墨的比較少
但如果從 OIDC 規格來看就會清楚許多
從規格來看,簽發 Token 的人叫做 Issuer
而接收 Token 的人叫做 Audience(client_id)
在 OpenID Connect §3.1.3.7. ID Token Validation 規格書裡提到
The Client MUST validate that the aud (audience) Claim contains its client_id value registered at the Issuer identified by the iss (issuer) Claim as an audience. The aud (audience) Claim MAY contain an array with more than one element. The ID Token MUST be rejected if the ID Token does not list the Client as a valid audience, or if it contains additional audiences not trusted by the Client.
Client 收到 Token 之後必須要檢查 aud 裡面是不是有包含自己在 Issuer 那裡註冊的 client_id
不過 Keycloak 是多租戶架構,他把每個 realm 都當作一個獨立的 Identity Provider(IdP)
所以,本質上你將多個應用程式註冊在同一個 realm 底下,就等同於使用相同的 IdP
既然負責驗證的都是同個人,所以多個 app 都可以共享 session,進而達成 Single Sign On
這部分比較抽象,從實驗來看會比較清楚,可參考 realm and client
另外切 realm 還有一個好處是你可以針對個別 realm 做個別客製化
比方說,可以設定
- 不同語系
- 不同主題
- 不同的 password policy
- 不同的登入機制(e.g. 要不要啟用 social login)
Keycloak Single Sign On Example
Prerequisite
1
2
3
4
5

$ docker -v
Docker version 29.4.0, build 9d7ad9f

$ docker-compose version
Docker Compose version v5.1.2
Seed Data
1
2
3
4
5
6
7
8
9
10
11
12
13
14
15
16
17
18
19
20
21
22
23
24
25
26
27
28
29
30
31
32
33
34
35
36
37
38
39
40
41
42
43
44
45
46
47
48
49
50
51
52
53
54
55
56
57
58
59
60
61
62
63
64
65
66
67
68
69
70
71
72
73
74
75
76
77
78
79
80
81
82
83
84
85
86

[
  {
    "realm": "customer",
    "enabled": true,
    "users": [
      {
        "username": "john",
        "enabled": true,
        "credentials": [
          {
            "type": "password",
            "value": "john",
            "temporary": false
          }
        ],
        "clientRoles": {
          "realm-management": [
            "realm-admin"
          ]
        }
      }
    ],
    "clients": [
      {
        "clientId": "ikae",
        "enabled": true,
        "publicClient": true,
        "directAccessGrantsEnabled": true,
        "standardFlowEnabled": true,
        "redirectUris": ["https://instagram.com", "https://facebook.com", "https://threads.com", "http://localhost:8080/*"],
        "webOrigins": ["+"]
      },
      {
        "clientId": "warmart",
        "enabled": true,
        "publicClient": true,
        "directAccessGrantsEnabled": true,
        "standardFlowEnabled": true,
        "redirectUris": ["https://instagram.com", "https://facebook.com", "https://threads.com", "http://localhost:8080/*"],
        "webOrigins": ["+"]
      }
    ]
  },
  {
    "realm": "employee",
    "enabled": true,
    "users": [
      {
        "username": "alice",
        "enabled": true,
        "credentials": [
          {
            "type": "password",
            "value": "alice",
            "temporary": false
          }
        ],
        "clientRoles": {
          "realm-management": [
            "realm-admin"
          ]
        }
      }
    ],
    "clients": [
      {
        "clientId": "dev",
        "enabled": true,
        "publicClient": true,
        "directAccessGrantsEnabled": true,
        "standardFlowEnabled": true,
        "redirectUris": ["https://instagram.com", "https://facebook.com", "https://threads.com", "http://localhost:8080/*"],
        "webOrigins": ["+"]
      },
      {
        "clientId": "sales",
        "enabled": true,
        "publicClient": true,
        "directAccessGrantsEnabled": true,
        "standardFlowEnabled": true,
        "redirectUris": ["https://instagram.com", "https://facebook.com", "https://threads.com", "http://localhost:8080/*"],
        "webOrigins": ["+"]
      }
    ]
  }
]
我們分成兩個 realm,然後各自底下有不同的 client
-
employee有ikae以及warmartclient -
customer有dev以及salesclient
1
2
3
4
5
6
7
8
9
10
11
12
13
14

version: '3.8'

services:
  keycloak:
    image: quay.io/keycloak/keycloak:26.7.0
    container_name: keycloak-lab
    command: ["start-dev", "--import-realm"]
    environment:
      KEYCLOAK_ADMIN: admin
      KEYCLOAK_ADMIN_PASSWORD: admin
    ports:
      - "8080:8080"
    volumes:
      - ./realm.json:/opt/keycloak/data/import/realm.json
realm and client
1
2
3
4
5
6
7
8
9
10
11
12
13
14
15
16
17
18
19

$ ADMIN_TOKEN=$(curl -s -X POST "http://localhost:8080/realms/master/protocol/openid-connect/token" \
  -d "client_id=admin-cli" \
  -d "username=admin" \
  -d "password=admin" \
  -d "grant_type=password" | jq -r '.access_token')

$ curl -s -X GET "http://localhost:8080/admin/realms/employee/clients" \
  -H "Authorization: Bearer $ADMIN_TOKEN" \
  | jq '[.[] | {id: .id, clientId: .clientId}]'

$ ADMIN_TOKEN=$(curl -s -X POST "http://localhost:8080/realms/master/protocol/openid-connect/token" \
  -d "client_id=admin-cli" \
  -d "username=admin" \
  -d "password=admin" \
  -d "grant_type=password" | jq -r '.access_token')

$ curl -s -X GET "http://localhost:8080/admin/realms/customer/clients" \
  -H "Authorization: Bearer $ADMIN_TOKEN" \
  | jq '[.[] | {id: .id, clientId: .clientId}]'
ADMIN_TOKEN 只能用一次,所以第一個 curl 用完要再拿一次 token
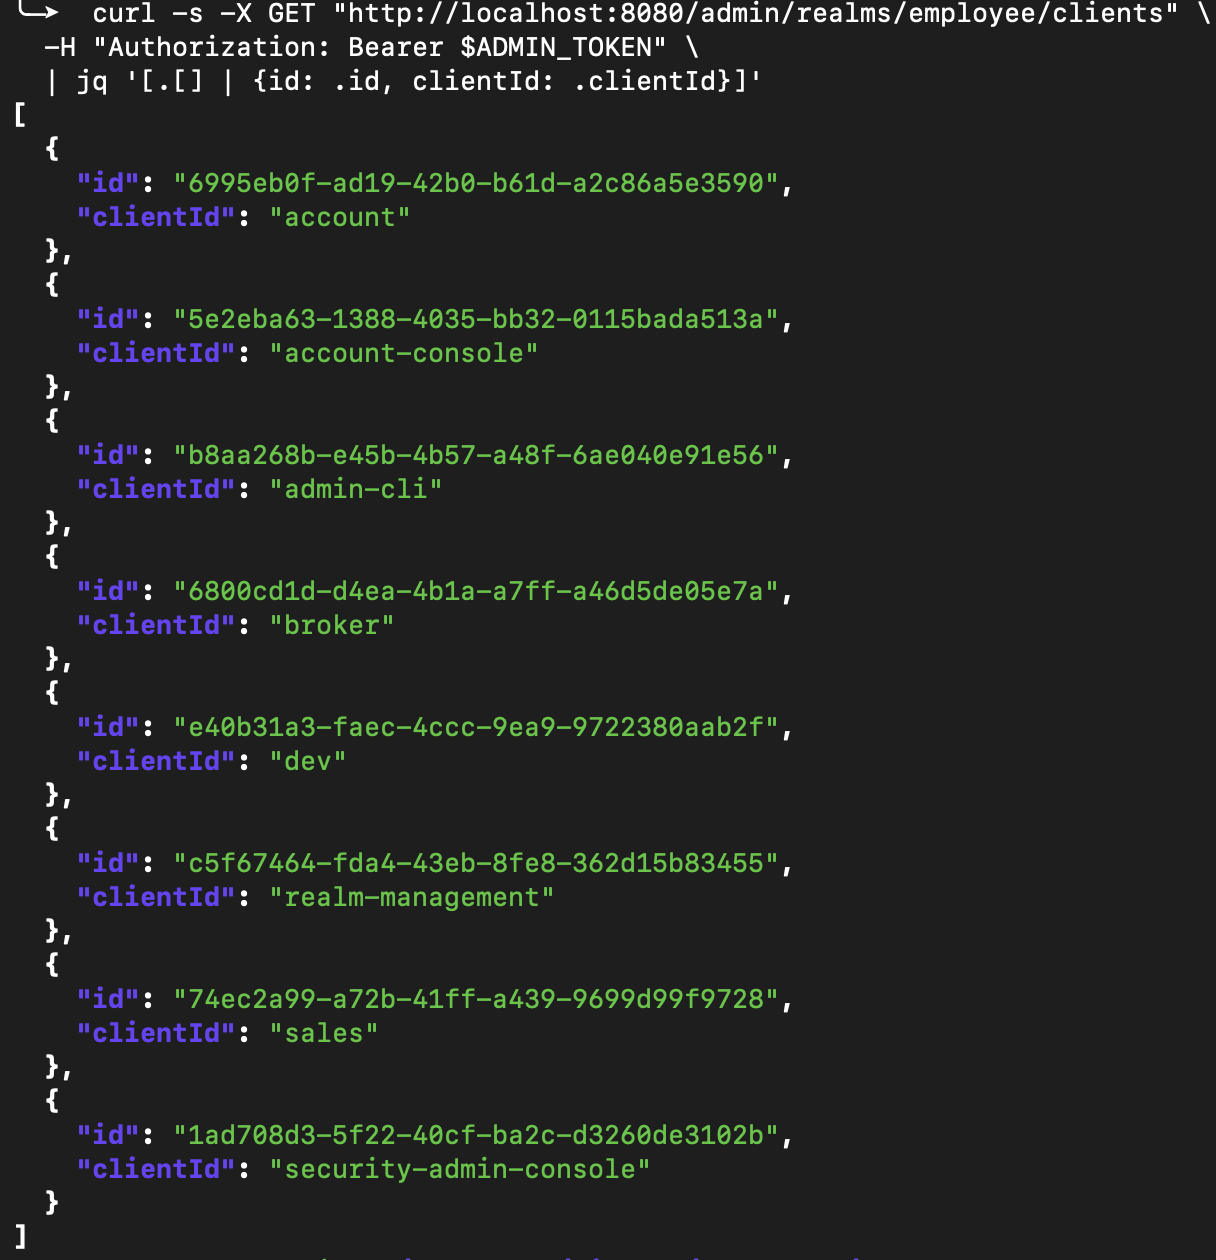
分別去拿 employee 與 customer 的 client 可以得到
employee |
customer |
|---|---|
 |
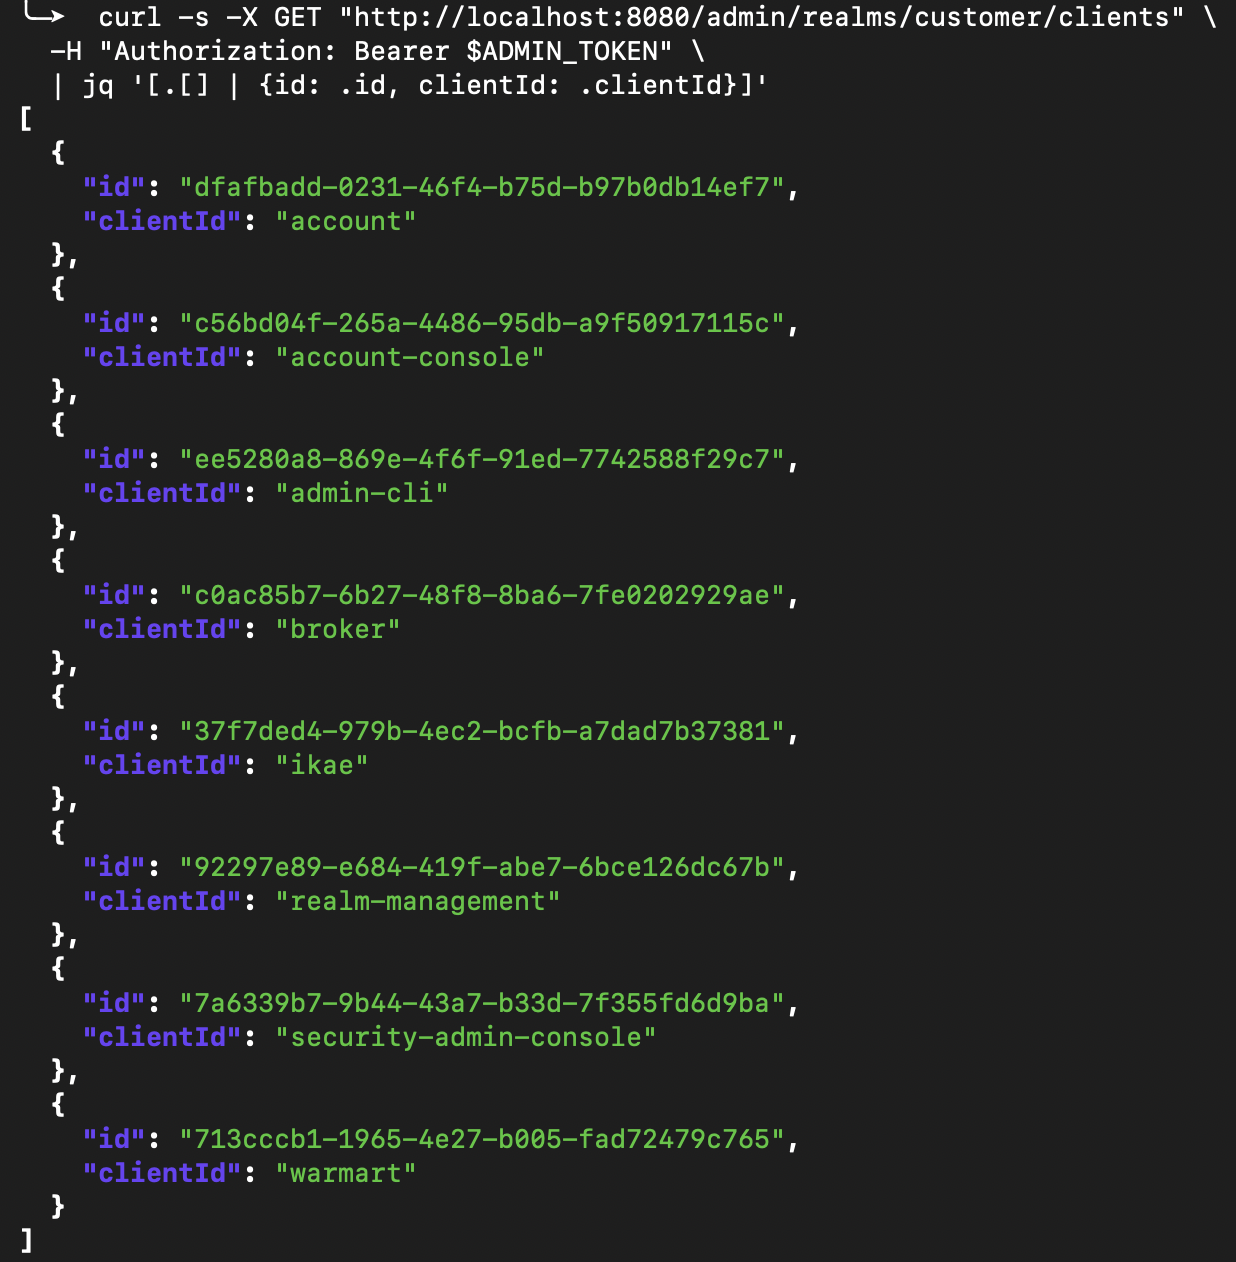 |
他有一些預設的 client, 我們在乎的是自己建立的 ikae, warmart, dev 以及 sales
你可以看到說 client 的的確確是跟在各自 realm 底下跑的,並且 id 還都不同
Single Sign On
接下測試一下,假設我在 customer realm
當我在 ikae 登入之後,warmart 看還需不需要重新打帳號密碼
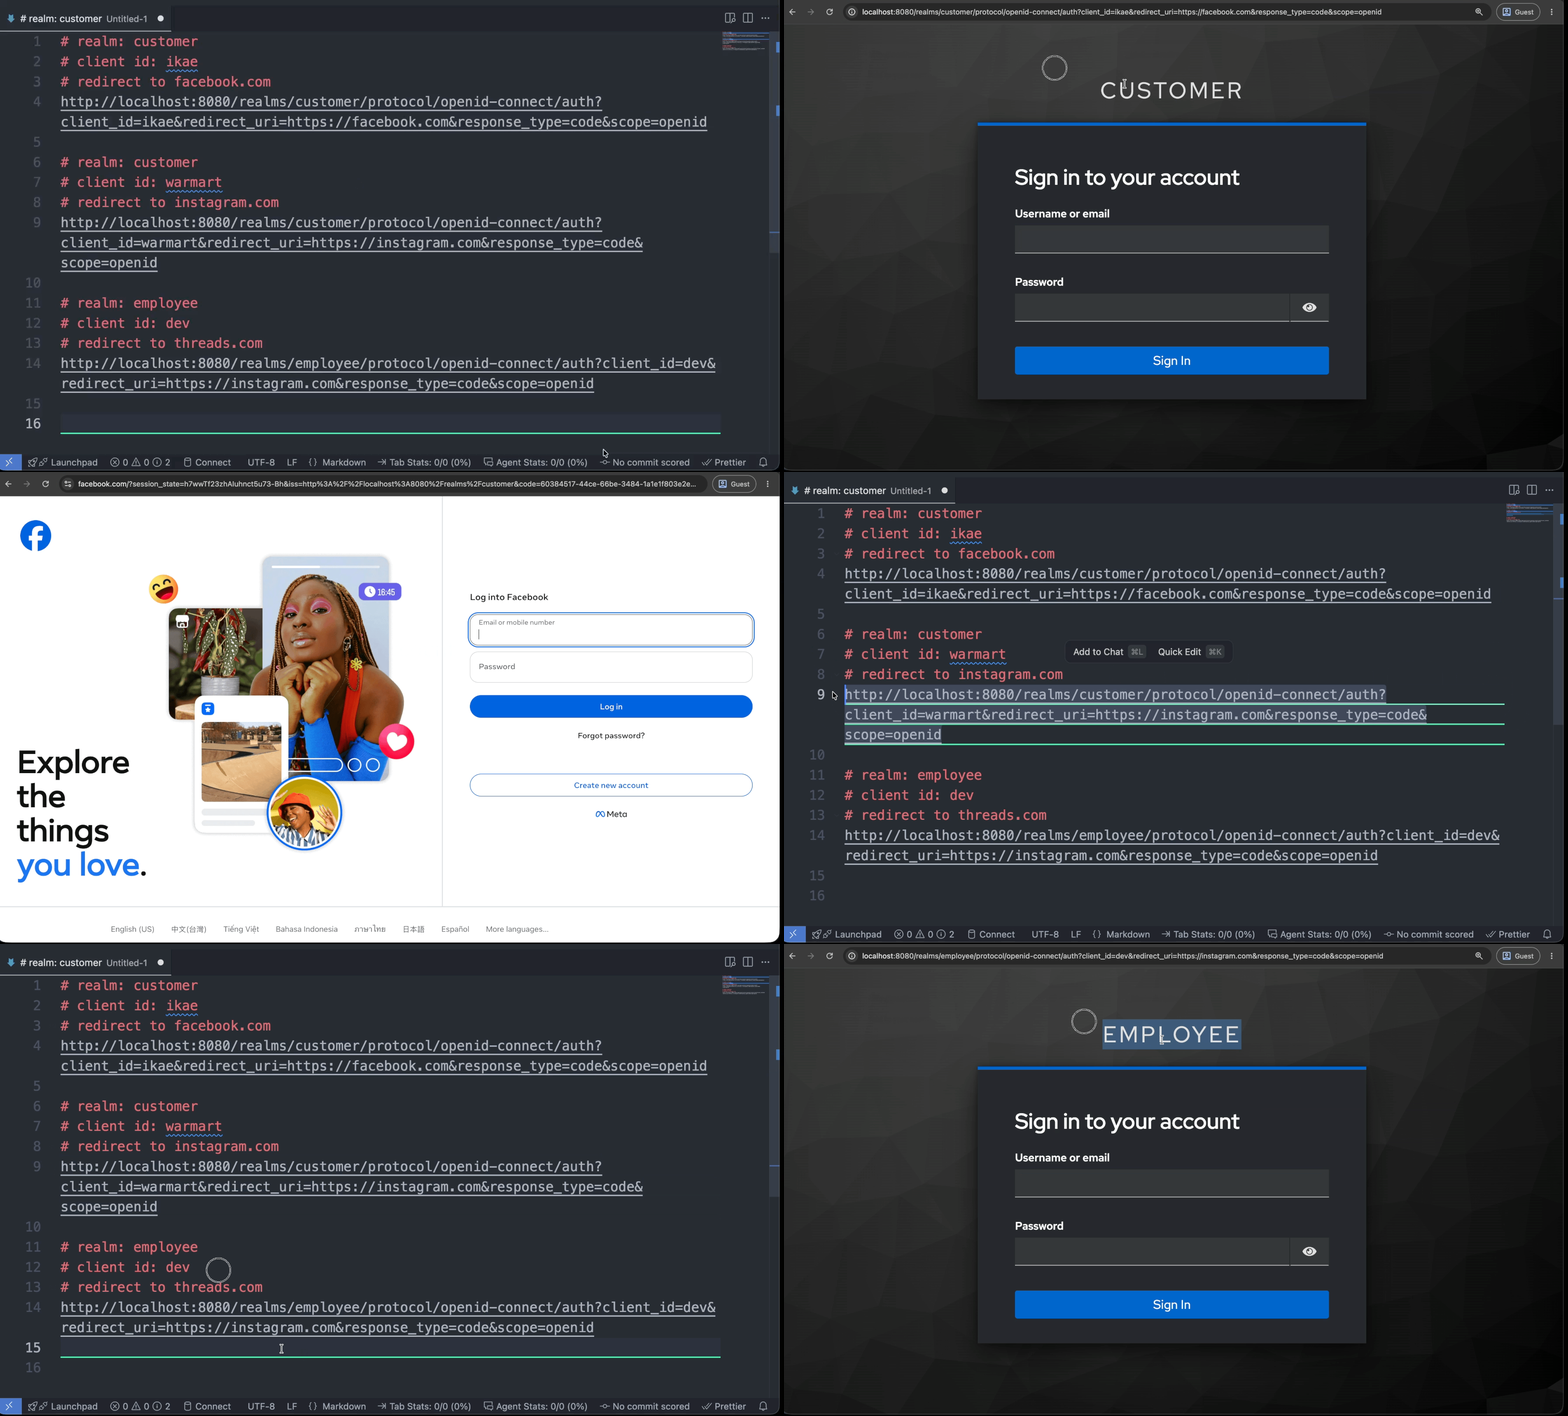
你可以看到說,第一次登入 customer.ikae 的時候,是需要打帳號密碼的
當我登入之後,第二次登入不同的 client customer.warmart 他也是馬上意識到我已經登入了,然後直接導向 redirect_uri
第三次我登入不同的 realm,你就發現誒 他要我打帳號密碼了
Single Sign On 就是那麼簡單
1
2
3
4
5
6
7
8
9
10
11
12
13
14

# realm: customer
# client id: ikae
# redirect to facebook.com
http://localhost:8080/realms/customer/protocol/openid-connect/auth?client_id=ikae&redirect_uri=https://facebook.com&response_type=code&scope=openid

# realm: customer
# client id: warmart
# redirect to instagram.com
http://localhost:8080/realms/customer/protocol/openid-connect/auth?client_id=warmart&redirect_uri=https://instagram.com&response_type=code&scope=openid

# realm: employee
# client id: dev
# redirect to threads.com
http://localhost:8080/realms/employee/protocol/openid-connect/auth?client_id=dev&redirect_uri=https://instagram.com&response_type=code&scope=openid
如果影片太快你看不清楚,這裡是詳細的內容
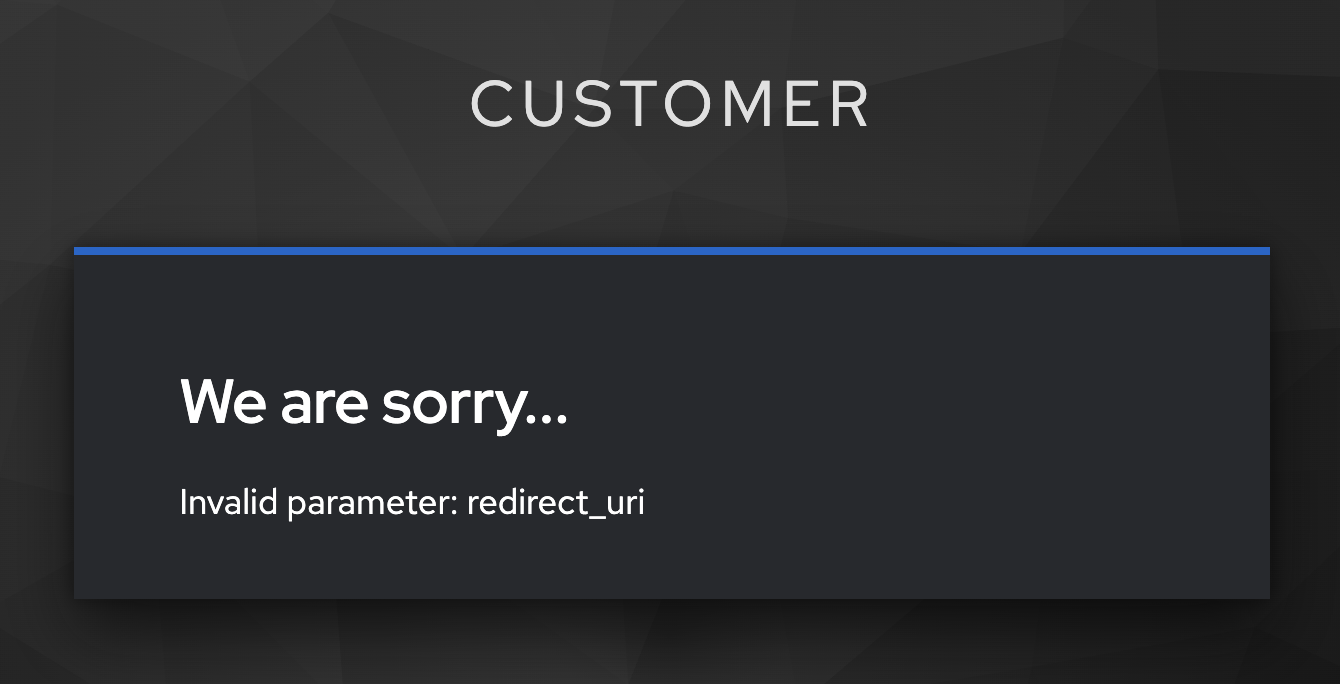
要注意到,redirect_uri 需要符合設定檔內的 redirectUris
如果不符合他就會報錯
以上的實作可以參考 ambersun1234/blog-labs/keycloak
Leave a comment